
Technology of shaping a central leader canopy for fruit trees in an orchard
14 min read
The sparse-tiered canopy is a versatile and reliable option for pome fruits on seed and semi-dwarf rootstocks, as well as for apricot, sweet cherry, sour cherry, plum, and cherry plum. The structure is formed from 5–6 scaffold branches, which are placed on the trunk sparsely or in separate tiers. No more than three to four branches are allowed per tier. A larger number of shoots from adjacent buds will weaken the central leader.
Canopy geometry and preparation of nursery plants
For proper tree development, it is important to observe spatial intervals and branch angles. When laying out the orchard according to 7 × 4 m and 6 × 4 m schemes, the optimal angle of inclination and departure of the main branches is 45–60°, and the angle of divergence between adjacent branches along the leader should be at least 90°. To ensure the canopy develops evenly, the upper branches are directed into the gaps between the lower ones.
- Angle of departure of the main branches — 45–60°
- Minimum angle of divergence — 90°
- Number of branches in the canopy — 5–6 units
- Maximum number of branches in one tier — 3–4 units
During canopy formation, it is necessary to maintain clear distances between its elements. This will prevent overcrowding and ensure good light penetration for each tier. Optimal parameters are shown in the table below.
| Canopy element | Recommended distance |
|---|---|
| Between individual branches on the central leader | from 20–25 to 40 cm |
| Between tiers | from 40–50 to 70–80 cm |
| From the lower tier to the next individual branch | 60 cm |
| Interval when a whorl (of two branches) is present | 0.8–1.0 m |
The height of the trunk for branched nursery plants on a vigorous rootstock depends on the biological characteristics of the crop. Adherence to these parameters facilitates further maintenance of tree circles and mechanized tillage in the orchard. The recommended trunk height is:
- apple: 60–80 cm;
- pear, plum, apricot, sweet cherry, cherry plum: 70 cm;
- quince, sour cherry, peach, and pome fruits on dwarf rootstocks: 60 cm.
Step-by-step formation of tiers and green operations
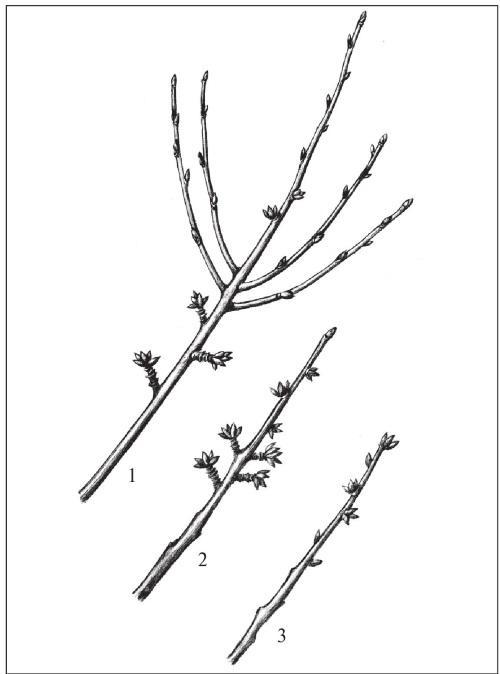
Most apple cultivars in the first year produce branches with departure angles of the lower branches at 70–80°, the upper ones at about 35°, with a divergence angle of less than 90°. In such cases, the canopy geometry must be corrected manually. To correct angles and subordinate branches, sequential pruning and stretching are performed.
- Remove the lower growth to the ring: it has too large a departure angle from the trunk and a divergence angle with the adjacent growth of less than 90°.
- Prune the central leader by transferring it to a lateral growth to completely eliminate shoot competition.
- Install a spreader between the trunk and growths 3 and 4 to increase the inclination angle, and lift growth 1 and tie it to the trunk, reducing its inclination angle to 45°.
- Shorten the prepared growths to the same level.
If you are not using spreaders and ties, prune growths with a small angle of inclination and departure to an outer bud. In this case, growth 1 with a large angle of inclination is pruned to an inner bud. The continuation branch of the central leader is shortened so that the distance from the upper lateral growth 4 to the cut is at least 70 cm. After establishing the second tier, the distance between the first and second tiers should be at least 50–60 cm. Keep in mind that strong shoots always grow from the buds near the cut, weaker ones in the middle zone, while the buds at the bottom remain dormant.
The selection of the main branches of the first tier is carried out in late May — early June, when the shoots in the upper zone reach a length of more than 15–20 cm. To do this, three lateral shoots are chosen on the tree, directed towards the row at an angle of 45° from the axial line. They should have departure angles of 45–60° and a divergence of at least 90°.
When selecting branches for the first tier, pay special attention to the bottom branch: it should not be weak or drooping. Choose a strong and upright branch. All lower shoots and leaf rosettes should be removed immediately to the ring with a pruning knife or by moving your hand from top to bottom, forming a clean trunk.
Excess shoots are removed to the ring or pinched again in July, when the growths in the canopy zone reach a length of more than 35–40 cm. During this period, the growth vigor of the shoots is regulated and they are subordinated to the leader. For shoots that are longer than the lower branch or compete with the leader, remove the growing point with four leaves. In other cases, pinching is not required. Simultaneously, the inclination angles of the branches are corrected using spreaders and ties.
Without performing a double green operation (in early summer and in July) to regulate the growth of future branches, it is impossible to create a canopy with the required parameters.
The second year: pruning the leader and summer pinching
In the second year after planting, the agronomist's main task is to stimulate active shoot growth and lay the foundation for the first tier of the canopy. For the proper development of nursery plants in the southern fruit-growing zone, it is important to achieve the target annual growth values:
- Growth of pome fruits — no less than 60–65 cm
- Growth of stone fruits — more than 65 cm
Spring pruning begins with the lower branches of the first tier. The lowest branch is shortened to 45–50 cm (for sweet cherry, apricot, cherry plum, and plum — to 60 cm), and the two upper branches are cut strictly at the same level as the first one. The central leader is shortened, leaving a clearance above the cut level of the side branches.
| Tree canopy shape | Height of leader cut above side branches, cm |
|---|---|
| Wide | 20–25 |
| Pyramidal | 25–30 |
If lateral shoots have already formed on the central leader, they are shortened depending on their initial length:
| Initial branch length, cm | Degree of pruning |
|---|---|
| 25–30 | To 4–5 buds |
| 60–70 | To 10–12 buds |
In summer, the growth of the central leader and extension shoots is regulated by summer pruning operations. On first-order branches in the zone up to 35–40 cm from the trunk, operations are performed in the following sequence:
- Remove all growth completely by cutting to the branch collar.
- Cut off excess vertical shoots at the collar, maintaining a distance of 15–30 cm between them.
- Pinch all remaining shoots at a height of 8–10 cm.
- Select two lateral shoots directed at an angle to the axis of the main first-order branch, at a distance of 50–60 cm from each other.
First-tier branches should be directed at a 45° angle to the row line, and second-tier branches — strictly towards the inter-row spaces. Since the second tier is established at a height of 180–200 cm from the ground, such an arrangement ensures that mature trees will not obstruct the passage of tractors and sprayers.
The third and fourth years: subordinating branches and establishing the second tier
In the spring of the third and fourth years, canopy formation is conducted from the bottom up — from the lower tier to the top of the leader. Special attention is paid to the selection of the fourth main first-order branch. It is established in the space between the lower branches, directed towards the inter-row space. The angle of emergence should be 50–55°, and the distance from the top branch of the lower tier should be 60–80 cm.
The minimum distance from the top branch of the first tier to the bottom branch of the second tier is 60 cm. This interval must be adjusted depending on the nature of shoot growth:
- in case of whorled branch arrangement on the second tier, the interval is increased to 0.8–1.0 m;
- if the second tier is derived from two adjacent buds, the interval should be 80–100 cm.
On the main branches of the first tier, two second-order lateral branches (preferably with a lateral position) and fruiting wood are formed at 25–50 cm intervals. They are positioned relative to the trunk according to the following scheme:
| Branch order | Spacing for placement |
|---|---|
| First second-order branch | 35–40 cm from the trunk |
| Second second-order branch | 50–60 cm from the first (on the opposite side) |
Do not be in a hurry to completely remove all vertical shoots. On cultivars with weak shoot-forming capacity, they can be broken or twisted, leaving them on the tree with slight shortening — this will help to quickly build up leaf mass.
When pruning growth, subordination must be observed: first-order extension branches are subordinated to second-order branches, and the fourth main branch is subordinated to the leader. Growth is shortened differentially:
| Growth length, cm | Degree of pruning |
|---|---|
| 25–40 (between selected branches) | To 4–5 buds |
| 60–70 | To 10–12 buds |
For cultivars with intensive branching, branches are shortened moderately or lightly. According to trial data, the optimal length of extension branches in this case should be less than 40–50 cm. During the summer period, it is mandatory to carry out a two-stage green pruning operation — this regulates growth, accelerates the appearance of fruiting twigs, and sharply reduces the volume of manual pruning required the following spring.
Completing the formation of the open-center tiered canopy
In the fourth and fifth years, the creation of the open-center tiered canopy skeleton is completed. During this period, the final, fifth main branch is established. It is placed in the spaces above the lower branches at a distance of 30–40 cm from the first single branch, directing it towards the opposite inter-row space at an emergence angle of 60–65°.
In parallel, second-order branchings continue to be formed on the first-tier branches. The spaces between them are filled with fruiting growth at 15–30 cm intervals, while competitors to the leaders of all growths must be removed. Growth between tiers on the trunk that were missed during summer pinching is also deformed.
If too many shoots remain on a primary scaffold branch, do not remove them flush with the branch (at the collar). An abundance of wounds will weaken the tree. It is better to snap or twist the branches at the base, slightly pruning their tips.
During this period, pruning is kept to a minimum, with special care given to the terminal shoots. On the fourth and fifth scaffold branches, absolutely all shoots are relegated to the category of secondary fruiting wood. In the summer of the fourth year, growth is regulated by means of green operations: bending shoots and pinching them. Shoots are removed completely only in cases of severe overcrowding.
- Branch angle of the fifth branch — 60–65°
- Interval between secondary shoots — 15–30 cm
- Height of the protective conductor stub — 3–5 cm
- Shoot length for rejuvenation pruning — 30–35 cm
After two years of commercial fruiting, the central leader is cut to a side branch, leaving a 3–5 cm stub. This ensures that the last branch takes on a more horizontal position. When the tree enters the full fruiting stage and the length of annual shoots decreases to 30–35 cm, rejuvenation pruning is carried out on two-year-old wood. This allows for the regulation of growth and commercial fruiting processes.
Forming an improved vase canopy
The improved vase (goblet) canopy is a leaderless system formed on light-loving and fast-growing crops. The main difference from a simple vase is that the scaffold branches are not set from adjacent buds, but at a distance of 15–25 cm from each other. Such spaced placement ensures high strength of the branch unions with the trunk.
| Crop | Planting scheme |
|---|---|
| Peach | 5 × 3 m or 6 × 3 m |
| Sweet cherry | 5 × 5 m |
| Apple | 5 × 4 m |
The improved vase canopy is most often formed on peach. This crop is characterized by rapid growth and produces two generations of shoots in a single season: standard spring shoots and premature summer shoots. Without annual pruning, the canopy quickly becomes dense, the inner branches become bare, fruits become smaller, and fruiting becomes biennial.
Six types of shoots are distinguished in peaches: vegetative, mixed, fruit, premature, water sprouts (suckers), and bouquet branches. For the canopy to be well-lit, it is formed from only three to four main primary scaffold branches. All other branches are transitioned to fruiting.
- Measure the trunk height. Reserve 50–60 cm of the tree trunk for the trunk height.
- Select scaffold branches. Leave 3–4 well-developed annual shoots, evenly spaced in space at a distance of 30–35 cm from each other.
- Shorten the branches. Prune the selected shoots, leaving 20–25 cm from the trunk. Remove excess branches flush with the collar.
- Remove the leader. Cut the central leader immediately above the fourth branch.
- Blind the buds. In spring, during pruning or when buds are swelling, remove all upper buds on the selected scaffold branches.
- Perform green operations. As the growing season progresses, weaken or completely remove shoots growing into the center of the canopy and shading it.
Green operations on an improved vase canopy are carried out strictly according to schedule. This allows for timely adjustment of growth and prevents excessive density in the central part. Work is carried out in three stages:
- first operation — when shoots are 7–10 cm long;
- second — when shoots are 30 cm long (in May – early June);
- third — throughout July.
Strong vertical shoots that form in the center of the canopy are removed flush with the collar or shortened to 20–40 cm. Timely removal of such wood helps maintain good illumination of the vase. As a result, the canopy remains open to the sun, and the fruits ripen evenly.
Forming secondary branches and cyclic wood replacement
If an excess of shoots forms on a young tree, do not rush to remove everything. Some excess growth can be bent into a horizontal position and tied down to accelerate fruiting, while the rest can be snapped off at the base. Lateral shoots that grow from the lower buds of a main branch should be pinched above the fourth leaf. This will curb their growth and stimulate the development of fruit buds.
In the spring of the third year after planting, begin setting up the secondary scaffold. On the main primary branches, choose the strongest shoots, observing spatial intervals. Proper placement of secondary branches will ensure good illumination of the canopy and prevent overcrowding.
| Secondary branch parameter | Optimal value |
|---|---|
| Length of secondary branches | 30–40 cm |
| Distance from the trunk | 30–35 cm |
| Distance between branches | 40–50 cm |
Between these branches, weaker shoots are left at a distance of 10–15 cm from each other. If you did not manage to perform pinching (green pinching) in the summer, these branches should be pruned in the spring according to the following scheme:
- half of the shoots are shortened during spring pruning to 15–20 cm;
- the remaining half is cut to 2–3 buds.
Second-order branches are the basis of the future harvest; most of the fruit wood is formed on them. To keep the canopy productive, maintain strict subordination of elements on all main branches. Second-order branches are formed on first-order branches every 40–50 cm, and branches responsible for fruiting and renewal spurs are formed on those.
- Length of branches for fruiting — 30–40 cm
- Length of renewal spurs — 3–5 cm
- Spacing on first-order branches — 40–50 cm
Over time, fruit wood ages and loses productivity. It is important for an agronomist to timely renew 3–4-year-old spur wood, replacing it with younger and more productive wood.
Do not allow the base of the main first-order branches to become bare. If this moment is missed, it will be extremely difficult to restore fruiting in the lower part of the canopy due to the drying out of dormant buds.
The described algorithm is also suitable for forming an improved vase-shaped canopy for apple and sweet cherry trees. The main difference lies in handling the central leader. In these crops, the leader is not removed immediately, but only after stable fruiting begins and the first two harvests are collected.
Read next
Pruning and training For gardeners
Fundamentals of canopy formation and pruning of sweet cherry in the orchard
Fruit growing For agronomists
Canopy formation technology of the "Russian spindle" for apple and pear trees
Pruning and training For agronomists