
Modern methods of canopy training for flat crowns and palmettes in fruit trees
12 min read
Modern versions of palmettes are much simpler to shape than their classic predecessors. The gardener no longer needs to maintain strict symmetry — branches are arranged more freely, and the work itself requires less time and effort. This approach allows for faster filling of the light space in the row and accelerates the tree's entry into fruiting.
- Palmette canopy thickness — 1.5–2 m
- Oblique palmette height — up to 2.5 m
- Angle of emergence of main branches — 45–60°
- Pruning height of a one-year-old tree — about 80 cm
How a modern palmette is structured
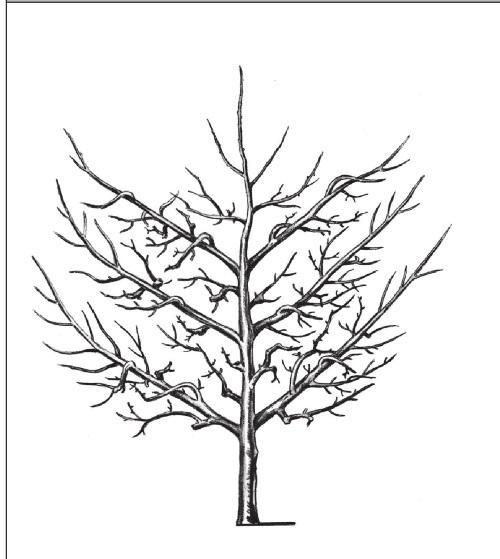
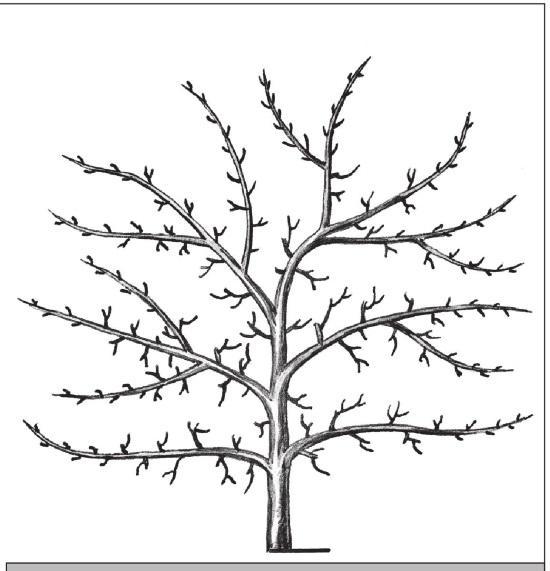
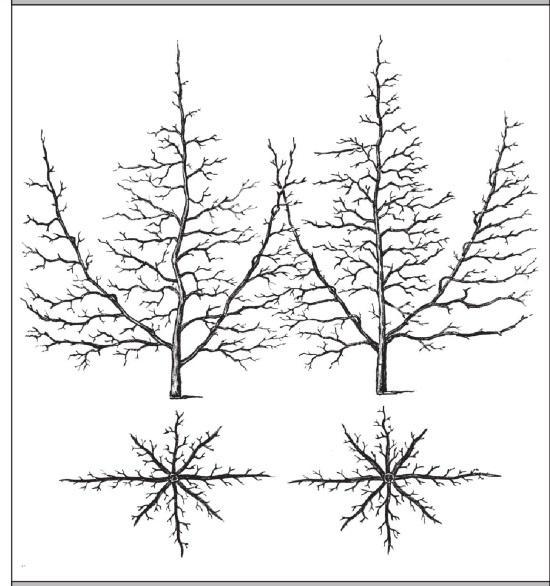
A proper palmette with inclined branches is formed on a central leader and consists of 6–8 skeletal branches arranged in pairs in tiers. The distance between them is chosen within the range of 60–120 cm, depending on the vigor of the rootstock-scion combination. Each subsequent tier is laid out 10–15 cm closer to the previous one, and the inclination angle of the branches is reduced by 5–10°.
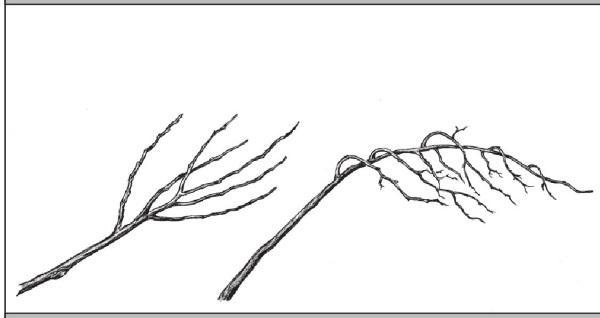
The main rule when working with the canopy is maximum preservation of wood. Excess branches are not pruned away but are instead trained into a horizontal or drooping position by bending. This restrains their growth and stimulates the formation of flower buds.
The growth of skeletal branches can be regulated by their inclination angle: lift a branch to enhance growth and lower it to weaken it. After the last tier is set, the central leader is pruned back to a side branch. When the branches of adjacent trees in a row meet, they are fastened together to increase the strength of the trellis — this allows the creation of a single, stable fruit wall without additional supports.
Observe the principle of branch subordination. Excessively strong, vertically growing shoots on the trunk and skeletal branches must be promptly removed by pruning to the collar, otherwise they will suppress the central leader.
Technology for shaping an oblique palmette
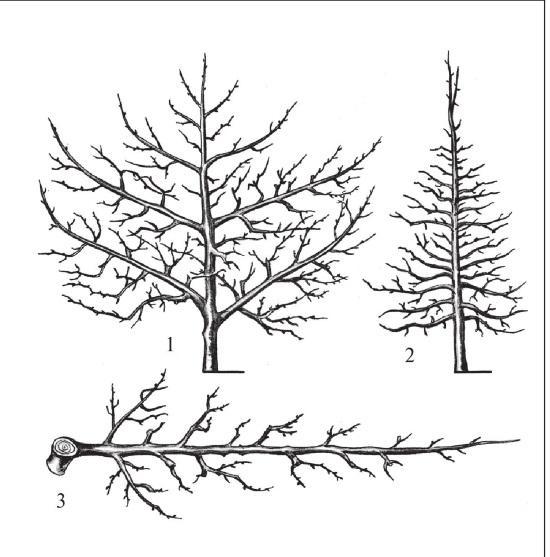
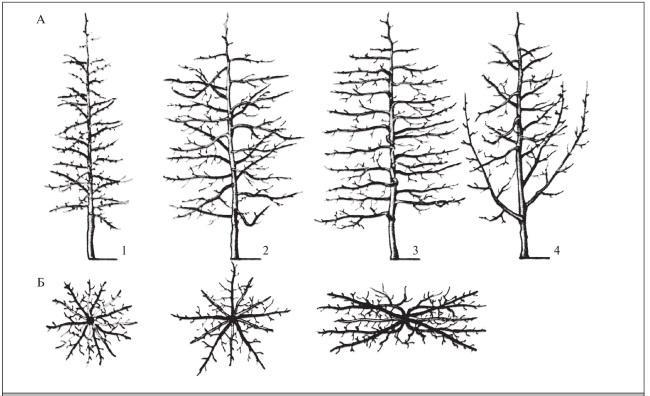
An oblique tiered palmette consists of a central leader and six primary skeletal branches directed strictly along the row. Second-order branches are not formed on them, leaving only fruiting wood. The inclination angle of the branches is set based on the biology of the cultivar: for trees with a pyramidal canopy, it is 40–45°, and for spreading or drooping ones, up to 60°.
The interval between tiers directly depends on the rootstock. Errors in these calculations lead either to canopy overcrowding or to exposure of the leader. Optimal parameters for various types of rootstock-scion combinations are shown in the table.
| Type of rootstock-scion combination | Distance between main branch tiers |
|---|---|
| Dwarfing | 50 cm |
| Vigorous | 70 cm |
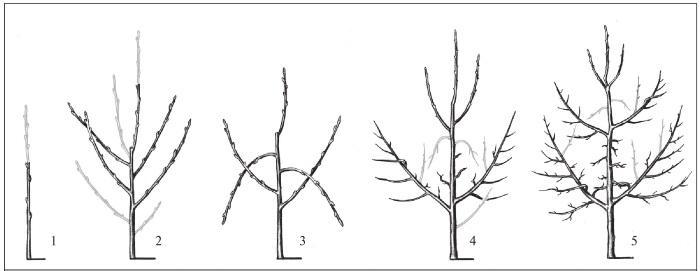
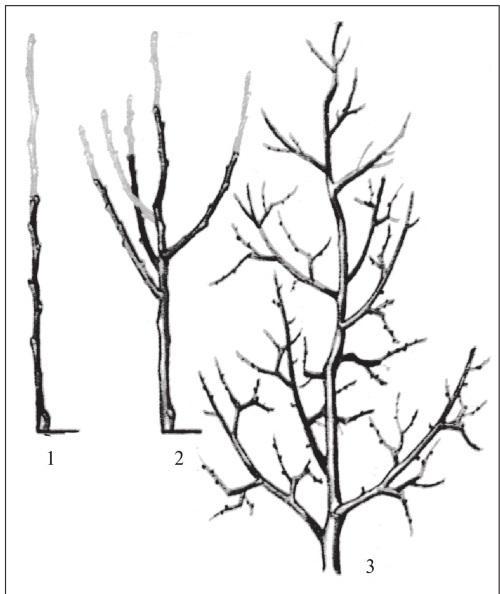
Canopy formation begins with a one-year-old nursery plant. In the spring, it is pruned at a height of about 80 cm from the soil level, after which the layout of the tier begins.
- Leave the top shoot as the future central leader.
- Remove 1–2 shoots growing at acute angles (competitors).
- Select 2 shoots as future main branches with a distance of 8–10 cm between them.
- Remove all shoots located lower on the trunk.
- Leave the shoots located higher to form fruiting branches.
At the end of summer, when the shoot growth slows down, the skeletal branches are set to the required inclination angle (45–50°) and tied to the trellis or temporary supports. All other shoots are moved into a horizontal position through fixation. When working with two-year-old nursery plants, one immediately selects the branches for the leader and the first tier, prunes competitors to the collar, cleans the trunk, and bends the intermediate branches.
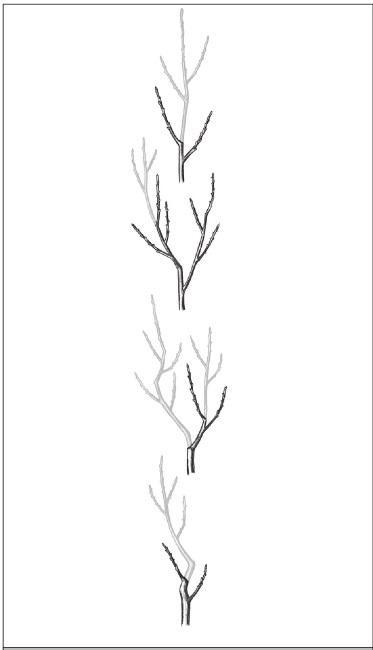
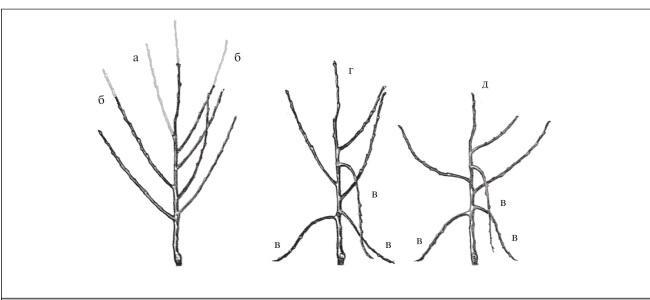
The vigor of skeletal branches is regulated by pruning to a side branch. If a branch grows weakly at too steep an angle, it is pruned to an upward-pointing lateral. In case of excessive growth and a vertical position, the branch is pruned to an outward-pointing horizontal lateral.
During the second and third year after planting, the framework of the future palmette is established. During this period, it is critical to maintain correct branch subordination. Otherwise, the tree will begin to produce vegetative water sprouts uncontrollably, and the lower part of the canopy will quickly become bare.
Regulations for forming palmette tiers
The branches of the first tier must remain the most vigorous in the canopy. If the hierarchy is disrupted and the upper branches are allowed to outgrow the lower ones, the tree will respond with a massive emergence of water sprouts. It is extremely difficult to combat them: in the place of every removed water sprout, several new ones quickly grow.
- Shortening the leader in the second year — 15–20 cm above the tier
- Clear zone at the base of skeletal branches — 25–30 cm
- Distance between branches in the third tier — 10–12 cm
- Height of the first pruning for a horizontal palmette — 70 cm
Do not rush to establish the second tier if the branches of the first tier are growing weakly. It is better to postpone this operation for a year and obtain a single-tier tree with good potential than to have two subpar, weakened tiers.
For the proper development of the canopy skeleton, perform the work strictly in the following sequence:
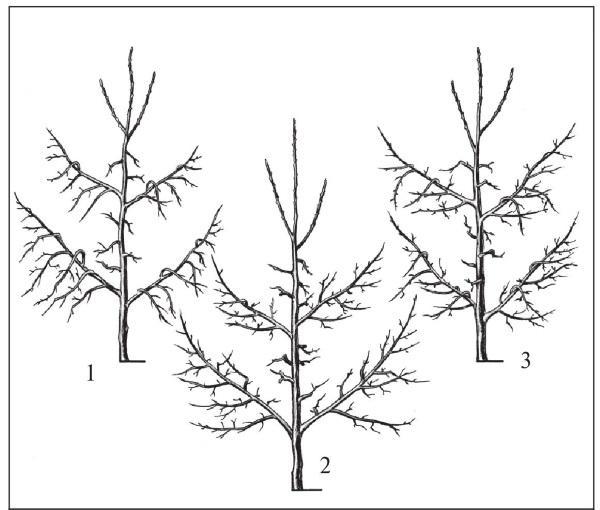
- Assess the height of the leader in the second year. Prune it 15–20 cm above the future location for establishing the second tier. If the leader has not reached this height, leave it unpruned and postpone the establishment of the tier until the next season.
- Remove strong shoots at the base of the first tier. Cut all vigorous vertical branches growing at the base of the bent skeletal branches of the first tier back to the collar. Leave weak twigs for fruiting. Clear a zone 25–30 cm long from the trunk of all ramifications.
- Establish the third tier in the third year. Remove strong competitor shoots from the leader, leaving only weak branches. Maintain a distance between branches within the range of 10–12 cm and establish them at wider angles of divergence than in the first tier.
In subsequent years, when the main tiers are already formed, canopy care comes down to annual maintenance pruning. It allows for keeping the tree height within specified limits and maintaining good light penetration inside the canopy. Perform all operations according to standard regulations:
- remove competitor shoots of the central leader;
- shorten the leader slightly above the intended location for establishing the next tier;
- completely remove strong vertical branches;
- thin out the fruiting wood when canopy light penetration deteriorates.
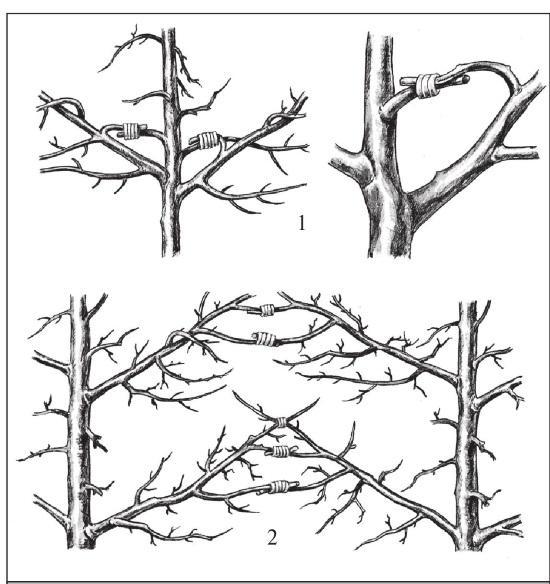
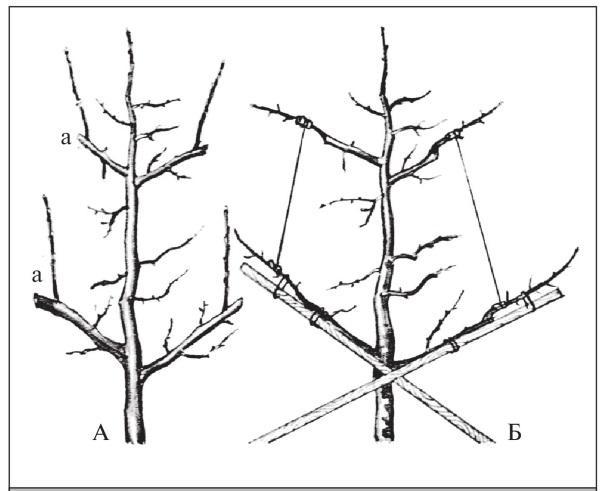
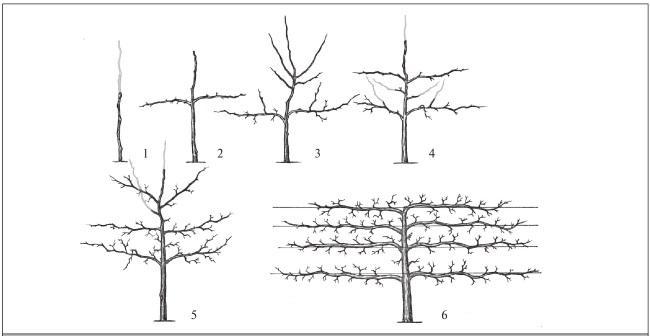
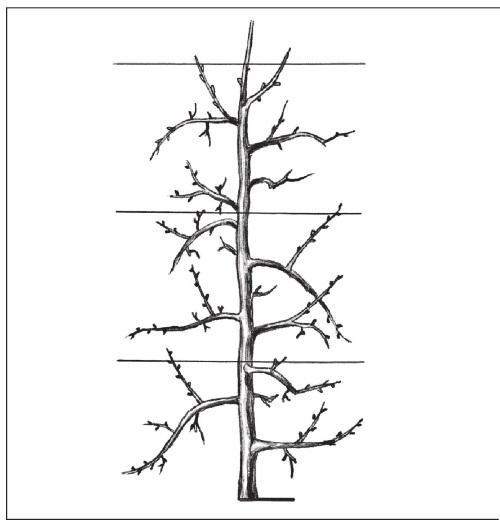
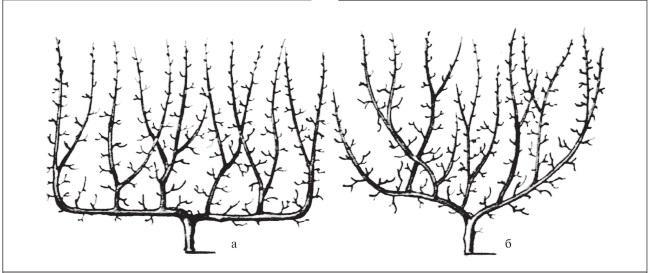
After establishing the last tier, it is important to maintain the leading position of the leader to prevent premature tree aging. To do this, every year or every other year, a portion of the leader is removed, with a cut to transfer growth to a new branch.
In the middle latitudes, it is not possible to form three tiers for a palmette with inclined branches. And there is no need to strive for this. Two tiers will be sufficient. Above the second tier, fruiting wood can be freely placed on the central leader.
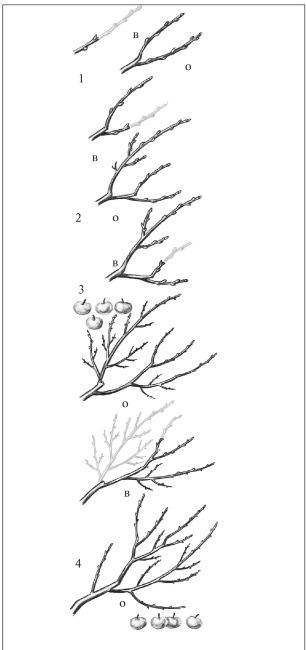
Maintenance pruning of a fully formed palmette consists of thinning branches and adjusting the load. The degree of pruning depends on the growth vigor of the branches. The weaker the growth becomes, the stronger the pruning should be. Branches that stop growing are gradually replaced with new ones.
At the same time, strong vertical branches located on the upper side of the main branches are removed as they appear, if they cannot be converted into fruiting wood. Fruiting branches should be spaced out more widely the higher they are located along the central leader and main branches.
Canopy width is limited, if necessary, by pruning with a transfer to a branch directed along the row, or by using mechanized contour pruning.
Rejuvenating pruning of fruiting branches is the same as in conventional canopies. The main branches are rejuvenated by cutting back to a shoot or to a specifically prepared strong branch.
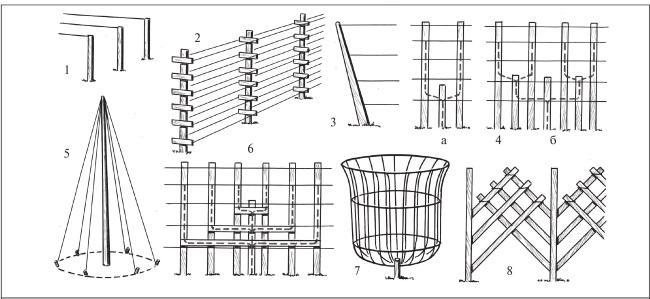
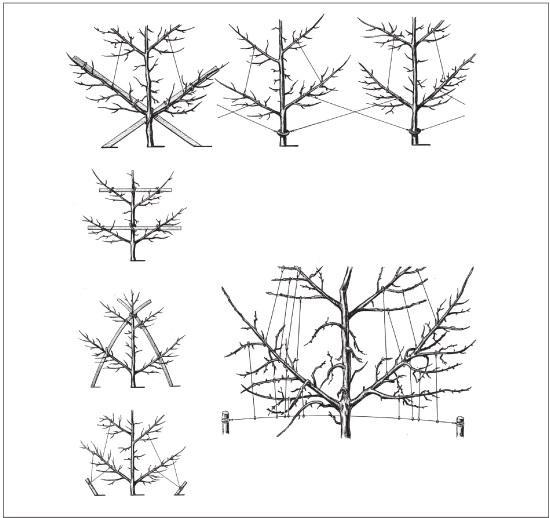
When growing palmettes on vigorous rootstocks, there is no need for permanent supports. Poles, stakes, laths, wire stays, etc., can be used as temporary supports (during the formation period).
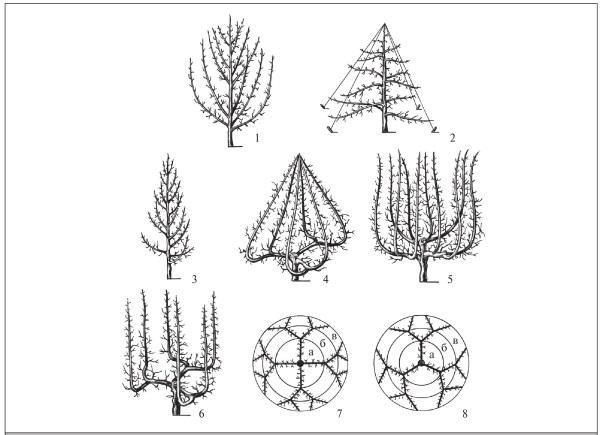
Free-growing palmette. Consists of a central leader and five to eight main branches oriented in one plane along the row. The first two branches are placed in a sparse tier with a spacing of 10–15 cm between them. They are directed at an angle of about 50° (± 5° depending on the growth habit). The remaining 4–5 (6 is acceptable) branches are placed individually.
| Distance between adjacent branches | 50–70 cm |
| Canopy height | 3–3.5 m |
| Canopy width | up to 2–2.5 m |
The growth vigor of the main and fruiting branches is controlled primarily by light pruning, although bending is also possible. Strong second-order branches are not established. Fruiting branches on the central leader and main branches grow freely.
Palmette with horizontal branches. Consists of a leader and four to five tiers of main branches in groups of two. They are directed along the row in opposite directions and secured horizontally by tying to the trellis. The distance between tiers depends on the cultivar and rootstock and is 40–80 cm. Strong branches formed on the main branches are bent to a horizontal or drooping position, directing them into the aisle. This palmette is suitable for apple trees, mainly those with a spur type of fruiting. Dwarfing or semi-dwarfing rootstocks are preferred.
Ferrugati palmette (cordon, palmette-cordon). All shoots formed on the trunk are bent below the horizontal and tied to wires stretched along the row. Arcuate bending of branches is also allowed. To ensure the formation of a sufficient number of branches on the trunk, it is shortened annually in accordance with the branching ability of the given species and cultivar. Trees begin fruiting very early. They grow weakly. They are short-lived.
Fan-shaped (fan) palmette. The main branches are located freely in a vertical plane. Some branches have a nearly horizontal direction, while others grow at various angles of inclination. All branches are hardly shortened, and taking into account their growth vigor, they are directed into empty spaces of the canopy. Pruning in the first years consists of shortening the leader. Branch growth is regulated by changing the angle of inclination.
Montreuil palmette. Can be formed directly on a double-armed horizontal cordon or by an improved method, in which it is somewhat similar to the fan-shaped one. The place for branching is not planned in advance. Branches are directed into free space.
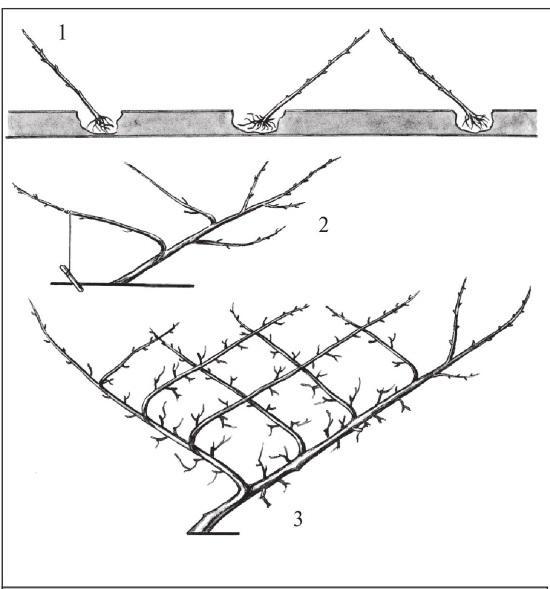
Lepage palmette. Formed step by step:
- A one-year-old plant is planted at an angle of 45°.
- In the second year, the tree is bent into an arc and secured in this position with ties.
- In the third year, one strong water sprout that appeared at the top of the arc is bent in the direction opposite to the main branch.
- Other strong water sprouts are removed. This is repeated in subsequent years. There is also a double Lepage palmette.
Ruzin palmette. A two-year-old plant with 3 branches is planted. In the first year, the tree grows freely. In the second or third year, the leader is bent and directed along the row, for which it is tied to stakes. The trellis is connected to the branches of neighboring trees. New branches that appear grow freely for the first season, and then they are bent into an arc, directing them along the row to the right or left, depending on where there is free space.
Marchand palmette. A trellis is created consisting of four wires located every 35–50 cm. The formation process includes the following steps:
Palmette and trellis canopy forms allow for maximum utilization of the orchard area, facilitate maintenance, and ensure uniform illumination of the fruit. The choice of a specific formation method depends on the vigor of the rootstock and the planned planting density.
The Marchand palmette is formed over three years. This system requires precise adherence to the timing of branch inclination for their uniform distribution in space.
Canopy formation according to the Marchand system begins with the inclined planting of nursery plants. This method allows for a flat canopy that is convenient for maintenance and mechanized harvesting. The height of a fully formed palmette is maintained at about 2 m. In this case, the extension branches of the trunk and main axes are shortened, taking into account their shoot-forming ability.
- Plant one-year-old plants at an angle of 45° at a distance of 1.5–2 m from each other. After planting, tie the plants to the trellis, allowing the branches to grow freely.
- In the spring of the second year, select the strongest branches every 20–25 cm along the length of the trunk. Direct them along the trellis by tying them to the wire at an angle of 90° to the trunk (45° to the horizon). Leave the branches on the lower side to grow freely without tying.
- In the third year, remove all overcrowding branches. Distribute the remaining branches so that they evenly fill the entire free volume of the canopy.
To reduce the amount of pruning and avoid creating large wounds, use early shoot removal during green operations.
Consider the disadvantages of the Marchand palmette: the growth of its leader slows down early, it is difficult to regulate the growth vigor of individual branches in such a canopy, and the pruning process itself is highly labor-intensive.
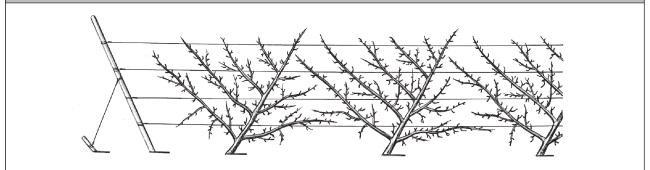
The Boucher-Thomas palmette is structurally similar to the Marchand system, but the specifics of planting and branch orientation make it possible to abandon shoot shortening entirely. This significantly accelerates the orchard's entry into fruiting.
- Plant one-year-old nursery plants at an angle of 30° to the horizon. When planting, tilt each odd-numbered plant in one direction, and each even-numbered one in the opposite direction. Tilt the first and last trees in the row inward.
- Direct the branches on the trunk at an angle of 30° to the horizon in the direction opposite to the tilt of the tree itself.
- Do not prune (shorten) the shoots. Perform canopy rejuvenation by pruning branches back to their lateral sub-branches.
- Be sure to perform removal of excess shoots, as well as thin out the number of flowers, fruit set, and fruits.
Trellis structures for ultra-high-density orchards
Specialized trellises are used to create ultra-high-density orchards and to work with dwarfing rootstocks. They allow for the rigid fixation of the tree's skeletal axes in space and support a high harvest load.
- Seabrook trellis planting grid – 2–2.5 × 0.6–0.8 m
- Trunk height of the Hague trellis – 50 cm
- Branching height of the Delbard trellis – 30–40 cm
- Height of the Delbard palmette (tier) – 70–80 cm
The English Seabrook trellis is a dense, inclined cordon hedge. One-year-old nursery plants are planted very close to each other at a 45° angle, leaning in one direction. The main branches are not subjected to shortening; they are directed horizontally along the trellis wires.
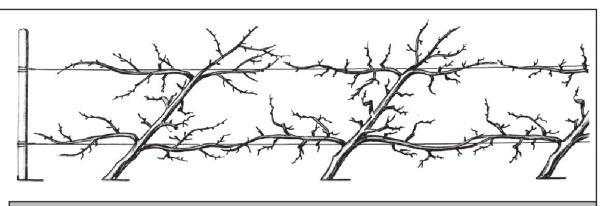
The Hague trellis is used for trees on dwarfing rootstocks. Stakes are used as support structures, with four rows of wire tensioned every 50 cm. The height of the finished palmette is 2–2.5 m, and aging and overgrown branches are replaced by young shoots.
- Plant one-year-old nursery plants with a trunk height of 50 cm. Arrange branches in tiers of two.
- When a branch reaches a length of 50 cm or a diameter of 10 mm, bend it horizontally and tie it to the wire.
- Also move all newly appearing shoots into a horizontal position. The only exceptions are weak branches, which are allowed to grow freely.
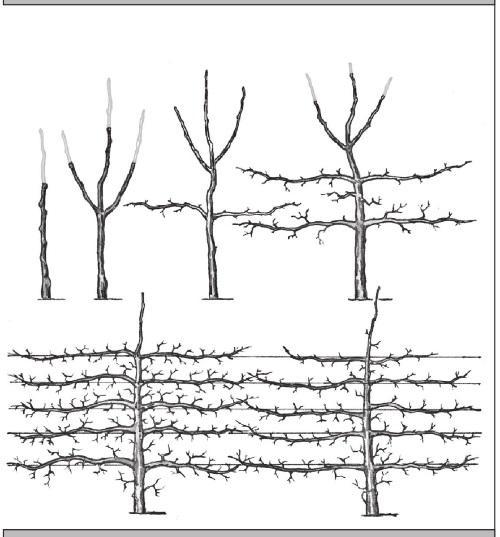
The Belgian trellis is an improved version of the Hague one. With a canopy height of 2–2.5 m, all branches emerging from the trunk are directed along the row and attached to the tensioned wires without strictly adhering to tiering or specific angles.
The Delbard trellis is formed with varying planting densities. The trunk branches out at a height of 30–40 cm into two main branches, the divergence angle of which depends on the planting scheme.
| Distance between trees, m | Divergence angle of branches, deg. |
|---|---|
| 4.5 | 21 |
| 1.5 | 49 |
Each of the two main branches carries one additional branch. These are established at a height of 70–80 cm from the soil level and directed into the canopy at the same angle of inclination as the main axes. Fruiting wood is formed on all four branches.
The Lepage palmette is formed with one or two main branches. To weaken growth processes and stimulate early fruit bud initiation, these branches are bent into an arc.
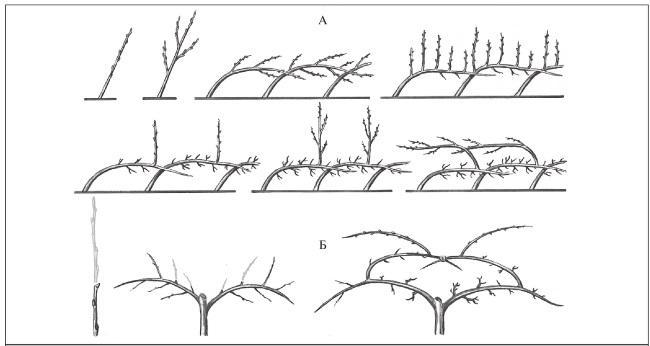
The Ruzin palmette is formed in stages with gradual arc-shaped bending of strong branches and strict regulation of vertical growth.
- After planting the one-year-old nursery plant, prune it.
- Leave three strong branches for further growth.
- In the spring of the second year after planting, bend the strong branches into an arc, and allow the weak ones to grow freely for another year.
- During winter pruning, completely remove all strong vertical shoots that formed on the upper part of the arc, leaving only one strong branch.
- In the autumn, bend the remaining branch into an arc.
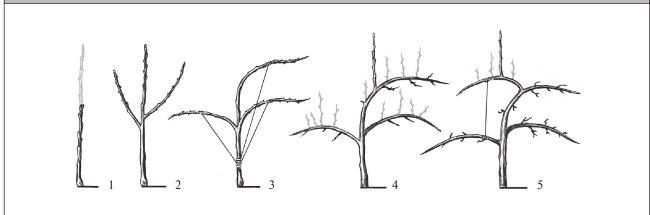
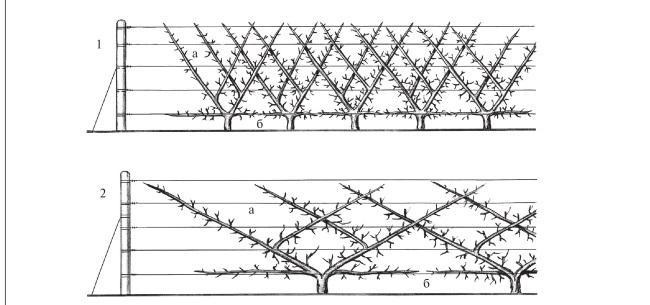
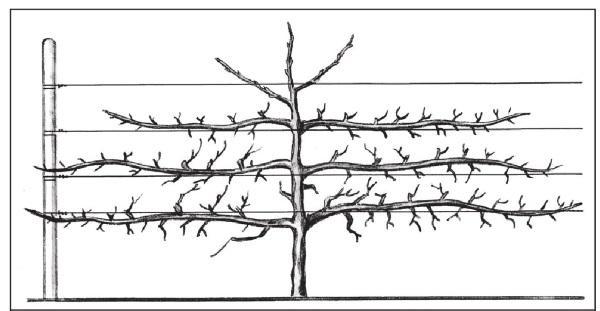
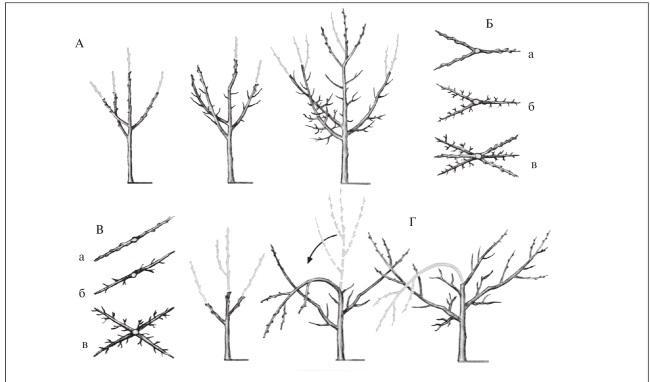
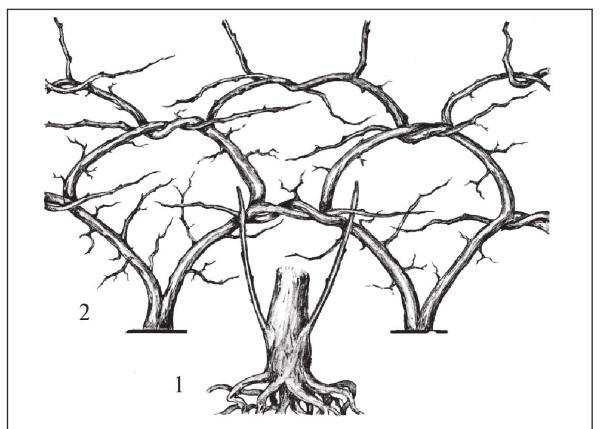
The supporting structure consists of posts with five wires stretched across them: the first at a height of 30 cm from the soil, then three at 43 cm intervals, and the fifth at a distance of 40 cm from the fourth. The total height of the trellis is 2 m. The palmette is very complex to form.
There is a large number of other very interesting training systems. Among them are the Schlosser, Verder, Hechinger, Mâta, Maple leaf systems, etc. The spread of these training systems is severely limited due to high capital investments for orchard establishment and significant labor costs for canopy formation. Common to these systems is a more or less free formation with branches directed along the row, while the differences lie in the methods of planting, placement, and direction of branch growth (horizontal, drooping, arcuate-curved).
Read next
Pruning and training For gardeners
Methods and rules for canopy reformation of fruit trees in the orchard
Pruning and training For gardeners
Techniques and rules for the first post-planting pruning of fruit trees
Pruning and training For agronomists