
Technology of top-grafting fruit trees using framework builders
9 min read
In regions with relatively harsh climatic conditions, fruit trees in the winter-spring period often suffer damage to the above-ground system, especially in trees of introduced cultivars with reduced frost resistance and winter hardiness.
A fairly reliable way to prevent freezing is the use of special trunk formers and canopy formers. To achieve this:
- plants of cultivars with mediocre or poor fruit quality, but with sufficiently high frost resistance of the bark and wood, and strong branch-to-trunk attachment, are grown;
- only the base of the tree canopy framework is left;
- scions of the desired cultivar are grafted onto it.
Usually, the requirements for a canopy former are met by old local cultivars that have passed endurance tests in the given conditions through long natural selection.
There are other cases when topworking (re-grafting) of fruit trees is necessary: for example, if it has become unprofitable to grow trees of a given cultivar due to poor fruit quality.
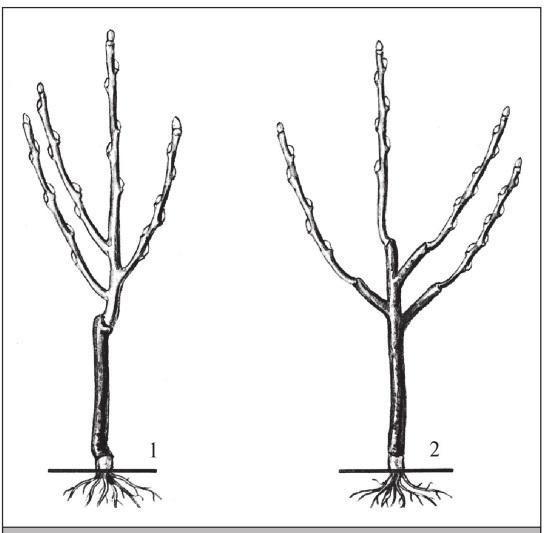
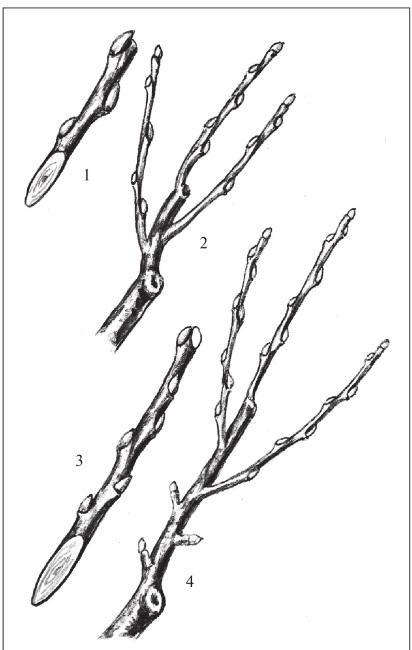
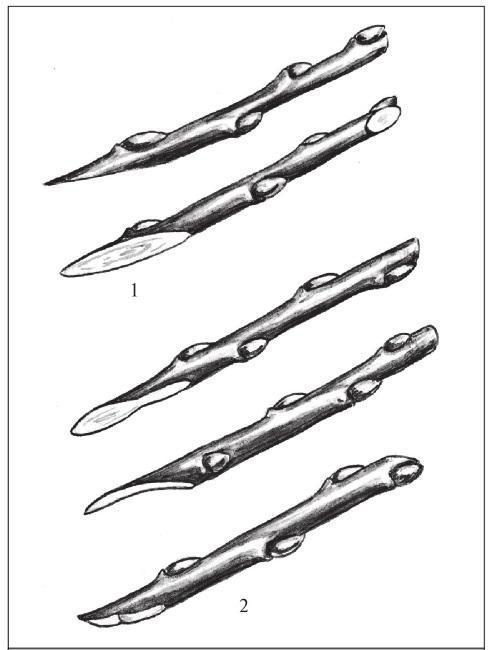
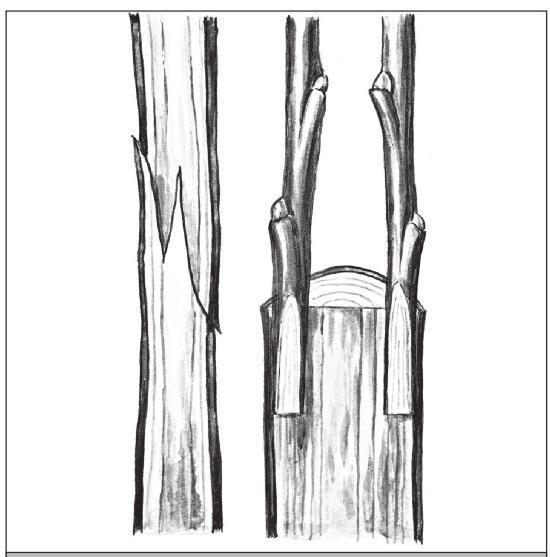
Topworking is usually performed using segments of one-year-old branches with three to four buds. Although, the use of longer scions with six to eight buds has advantages in a number of cases.
After grafting with such elongated scions:
- long vegetative-type shoots usually form from the upper buds;
- short fruiting branches (spurs, dards) form from the lower ones.
As a result, the first fruits can be obtained as early as the second year. In addition, the onset of fruiting restrains undesirable, excessively vigorous growth.
Grafting must be carried out with well-maintained tools. Cuts should be smooth, even, and free of distortions or jagged edges. The length of oblique cuts should be 3–3.5 times the diameter of the scion. A bud should be positioned in the middle of the elongated cut on the opposite side. When placing the scion, one must ensure that the cambium layers are aligned, rather than the outer bark layers of the scion and rootstock.
If the cut on the rootstock (branch) is wider than the thickness of the inserted scion, it is shifted to one side so that the cambial layers coincide. After the scion is placed and tied, the parts of the branch cut left exposed should be carefully covered with grafting wax.
Topworking of apple trees is best done in the spring during active spring sap flow. It is possible in the summer, but failures occur more often. For example, if growth begins during a summer graft, the resulting shoots may not harden off by autumn and will freeze in winter.
Grafting stone fruits with scions should be completed before the beginning of the growing season. Performing this work later drastically reduces the success rate.
Trees with a healthy, strong framework and branch growth in length of at least 25–30 cm are suitable for topworking. However, the older the tree, the more branches are subject to topworking, and the greater the disturbance to the established dynamic equilibrium between the root and above-ground systems.
| Tree type | Optimal age |
| Trees to be topworked | 4–10 years |
Trees are prepared for topworking immediately before the operation.
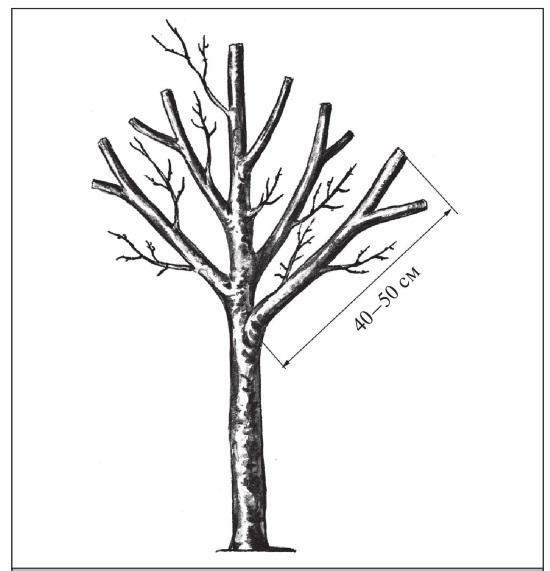
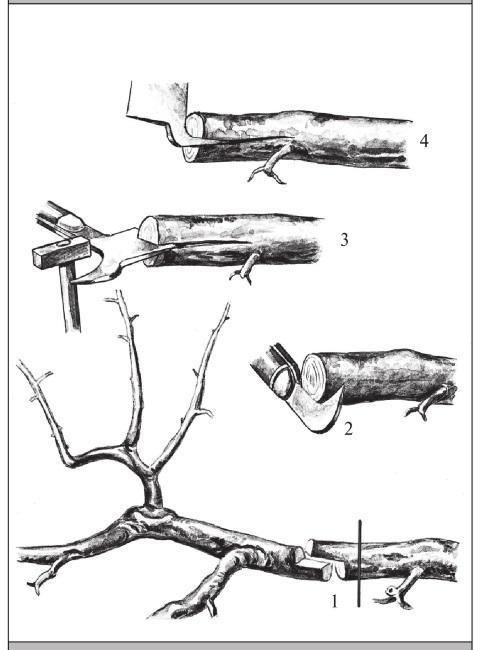
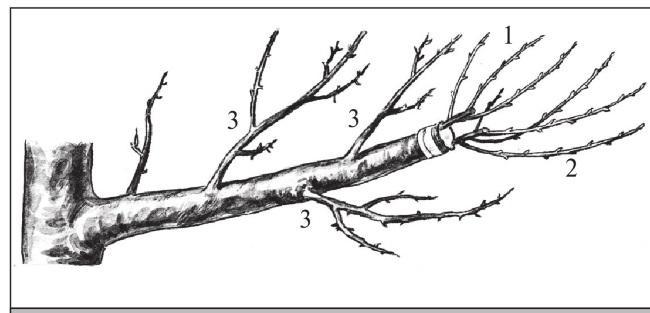
Topworking fruit trees on canopy formers helps to quickly update the orchard assortment and replace low-value cultivars. The success of the operation depends on the correct preparation of the branches and the precision of the cuts. Choose the grafting methods you are most skilled in — under equal conditions, they will provide the highest success rate.
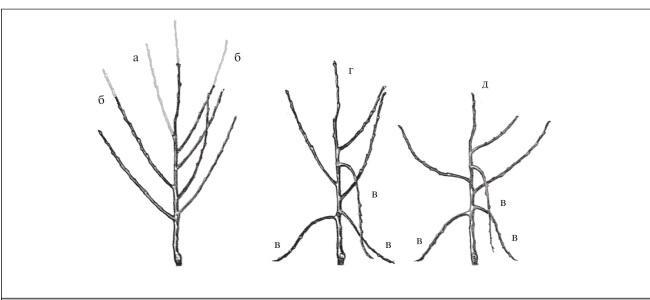
Topworking fruit trees onto canopy formers allows for the quick renewal of a cultivar or improvement of the orchard's winter hardiness. The success of this operation largely depends on the correct preparation of the canopy. Branches for topworking are pruned strictly at a certain distance from the central axis, necessarily maintaining their natural subordination. If these rules are violated, the tree will either start vigorously producing suckers of the old cultivar or the canopy will quickly become too dense.
Observe the pruning distance from the central axis: it should be 30–50 cm. With longer pruning, the tree will start wasting energy on suckers of the old cultivar, while pruning that is too short pruning will cause excessive canopy density.
- Pruning of branches from the central axis — 30–50 cm
- Transverse incision for T-budding — 1–1.5 cm
- Length of the shield when grafting to the end — about 5 cm
- Oblique cut for splice grafting — up to 3 cm
- Depth of the incision for the tongue — 1–2 cm
- Distance between scions under the bark — at least 3 cm
- Prune the branches to be grafted at a distance of 30–50 cm from the central axis, maintaining the hierarchy of the canopy.
- Smooth the surface of the branch cut with a sharp gardening knife to accelerate healing.
- Cut the upper end of the scion above a bud, and prepare the lower end for the chosen grafting method.
In hot weather, grafted scions dry out quickly, so they must be protected from direct sunlight with screens made of white paper, parchment, film, or paper bags. The protection is removed after the first leaves unfold, and young shoots are tied to slats to protect them from damage by wind and birds.
Techniques for performing various grafting methods
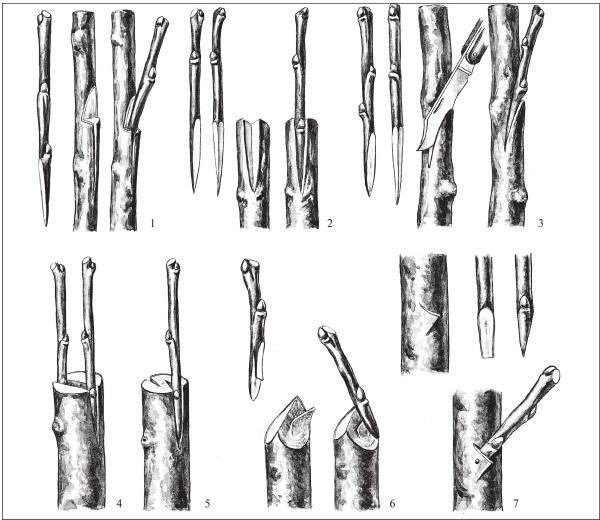
T-budding (T-shaped graft). Before starting, clean the branch of dust and dirt, then make a T-shaped cut in the bark (1–1.5 cm transverse, up to 3 cm longitudinal) without damaging the wood. Carefully separate the bark with a knife. On the scion, prepare a shield with a bud and a thin layer of wood by making bark cuts 1.2–1.3 cm below and above the bud. Insert the shield into the rootstock cut, trim the protruding part along the transverse line if necessary, and tie it tightly, leaving only the bud exposed. This method is suitable for both bud grafting and grafting entire branches.
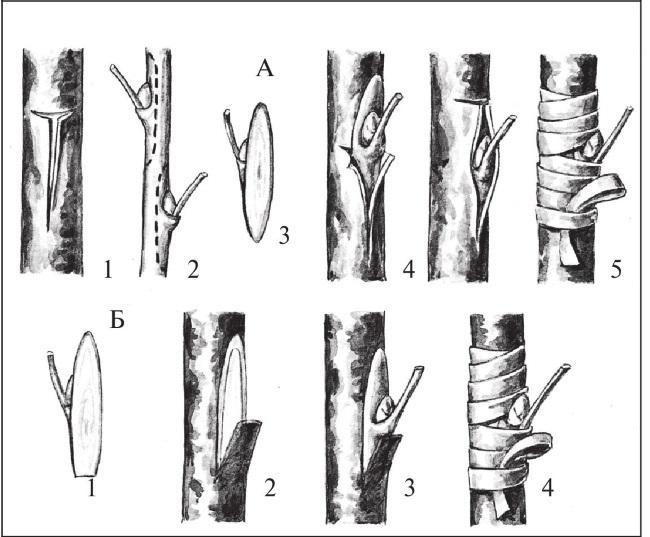
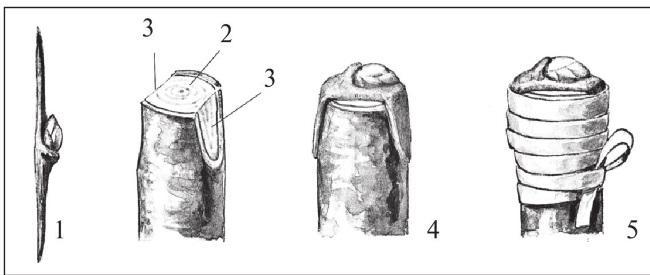
Bark grafting to the branch end. This method is used for grafting shields without wood, approximately 5 cm long. Cut the branch with pruning shears and make two longitudinal bark cuts on opposite sides of the end, corresponding to the width of the shield. Place the shield on the branch end, pressing its free ends tightly against the prepared lateral bark cuts. Perform standard binding, and cover all exposed wood areas on the end with grafting wax.
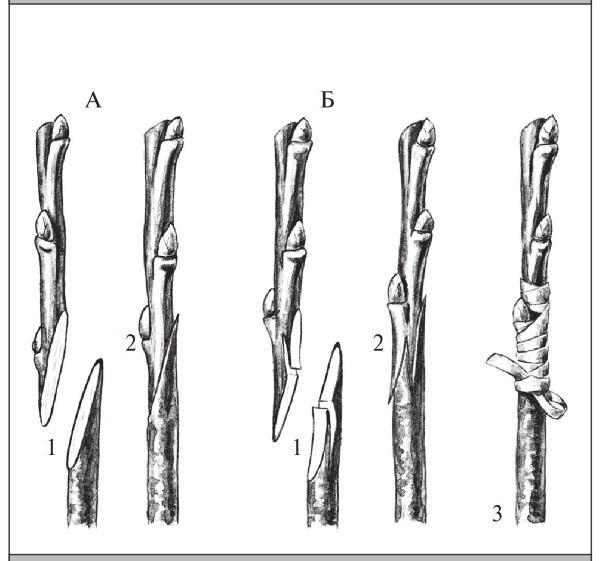
Whip-and-tongue grafting. This method is indispensable in cases where the branch and scion have the same thickness. Make oblique cuts up to 3 cm long on both components. On each cut, starting from the upper edge, make a longitudinal tongue cut 1–2 cm deep. Align the scion and rootstock so that the tongues fit tightly into each other's cuts, then perform the binding.
Side grafting. This method is simpler than T-budding, provides higher bud survival, and prevents overgrowth. On the rootstock, make a longitudinal bark cut with a small shoulder to better hold the shield. The dimensions of the cut must precisely match the length and width of the shield. The main requirements here are the perfect alignment of the cambial layers, tight fit of the cuts, and quality binding.
Side grafting with a tongue. Use this option if the branch being grafted is significantly thicker than the scion. Prepare the scion in the same way as for whip-and-tongue grafting. Make a side cut on the rootstock, the width of which must strictly equal the thickness of the prepared scion.
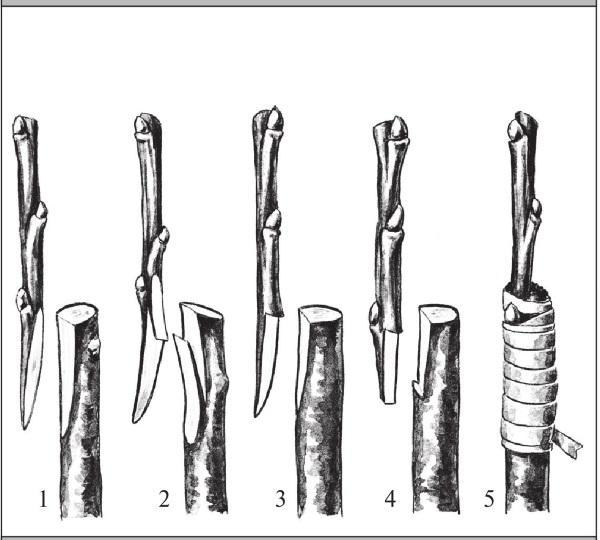
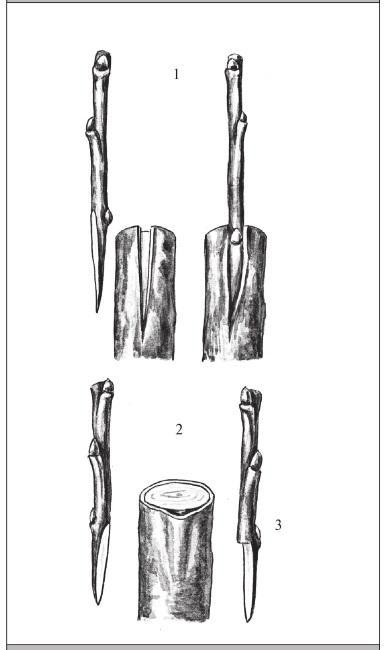
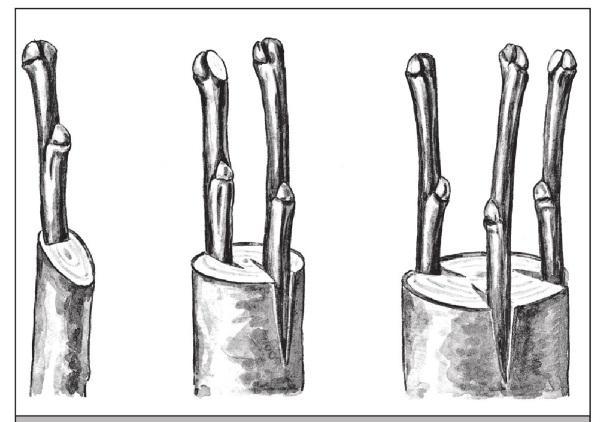
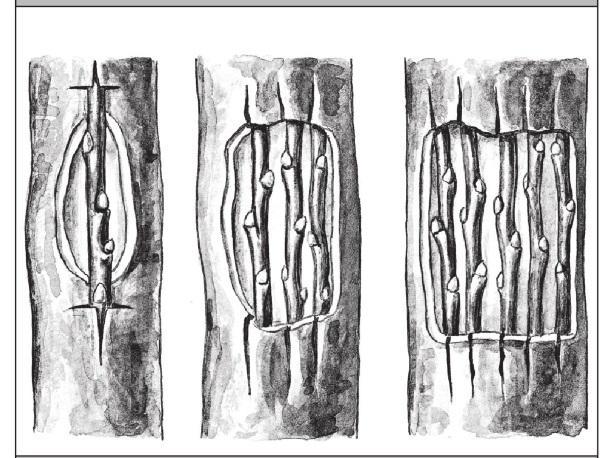
Cleft grafting under the bark. On the cut end of the branch, make a vertical bark incision 2–4 cm long. Carefully separate one or both edges of the bark from the wood and insert the prepared scion with an oblique cut inward into the resulting pocket. When installing the scion, ensure that the upper edge of its cut protrudes 3–4 mm above the end of the branch. Several scions can be grafted onto one large branch, placing them no closer than 3 cm from each other.
The choice of top-working technology depends directly on the diameter of the branches, the general condition of the tree, and the specific management objective. In gardening, special methods are used that allow minimizing harvest losses when changing cultivars and saving trees with serious trunk damage. The success of these operations depends on the geometric precision of the cuts and adherence to strict deadlines.
- Branch diameter for cleft grafting — 3–8 cm
- Depth of branch split — 5–10 cm
- Side incision angle — 20–25°
- Depth of saw cut for bridge grafting — 1–2 cm
- Bridge installation spacing — every 2.5–3 cm of wound width
- Binding removal time — 20–25 days
Grafting under the bark can also be done without a longitudinal incision. To do this, carefully separate the bark from the wood with a wedge made of hardwood, then insert the scion into the resulting gap. To restore the canopy in bare areas of skeletal branches that cannot be removed, make a triangular bark cut on them. Insert a scion with a wedge-shaped cut at the end into it and secure it with a small nail.
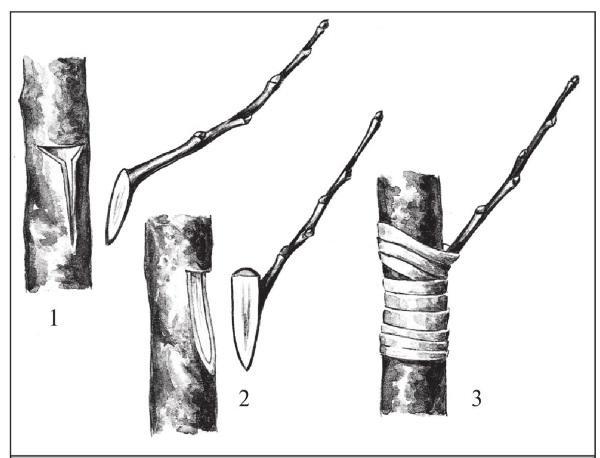
Parasitic grafting helps to temporarily—for the next 2–3 years—preserve the fruiting of a branch that is planned for removal. This reduces tree stress during the gradual canopy replacement, as the plant retains its assimilation surface. This method is particularly relevant for the reconstruction of old orchards.
- Make a 1–2 cm deep notch on the side of the branch at the location of its future removal.
- Chisel the wood upwards from the notch, forming a 5–8 cm long niche.
- Carefully clean the edges of the resulting notch with a grafting knife.
- Graft the scion under the bark into the prepared niche.
Stone fruits are extremely sensitive to radical pruning and topworking. When working with them, be sure to leave branches above the grafting site until the buds on the grafted scion have fully awakened.
For high-quality union, it is important to accurately align the cambial layers of the rootstock and scion. When using "Gaisfuss" (cleft grafting with a V-shaped cut), the lower end of the scion is cut into a wedge narrowing downwards and inwards, and a corresponding notch is made on the end of the branch. For side-slot grafting, a 3–3.5 cm long bark incision is made at a 20–25° angle, and the branch is slightly bent to facilitate the insertion of the scion. On branches with a diameter of 3–8 cm, classical cleft grafting to a depth of 5–10 cm or half-cleft grafting is used.
Bridge grafting for the treatment of girdling injuries
Girdling injuries to the trunk caused by rodents or frost cracks threaten the survival of the tree. In such cases, bridge grafting is essential, as it restores sap flow. Before starting work, the wound is carefully cleaned down to healthy tissue, and the edges of the bark are trimmed evenly at the top and bottom. Scions, root suckers, or annual nursery plants specifically planted nearby are used as bridges.
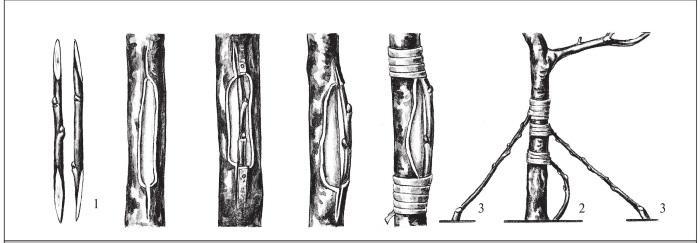
- Make long oblique cuts on both ends of the scion.
- Insert the lower end of the scion into a T-shaped or wedge-shaped bark incision below the wound and secure it with a small nail or binding.
- Gently bend the scion into an arch, insert its upper end into the upper bark incision, and fasten it tightly.
| Parameter | Recommended value |
|---|---|
| Scion spacing for bridge grafting | One scion for every 2.5–3 cm of wound width |
All open cuts, wounds, and joints during bridge grafting must be hermetically sealed with grafting wax or putty. After topworking, regularly remove wild suckers of the old cultivar appearing below the operation site so they do not drain nutrients.
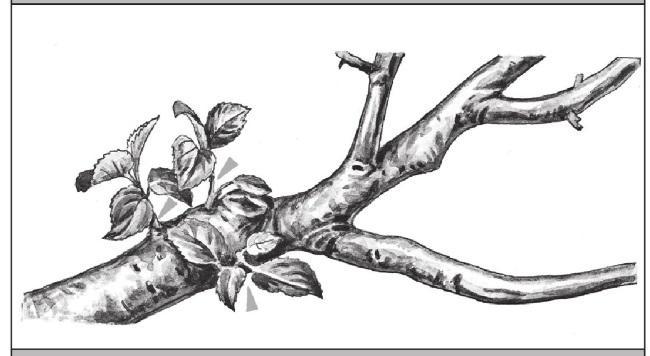
Be sure to remove the binding material 20–25 days after grafting. If this is not done in time, the tape will begin to cut into the growing bark, constrict the tissues, and weaken the branch.
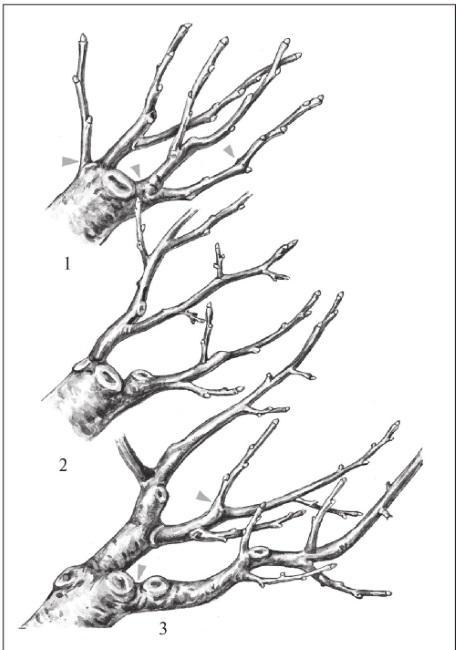
All branches of the old cultivar within 15–20 cm of the grafting site must be removed. A branch located lower down can be left for a while, but excessive growth should not be allowed.
It is inadvisable to leave branches of the old cultivar on topworked young trees.
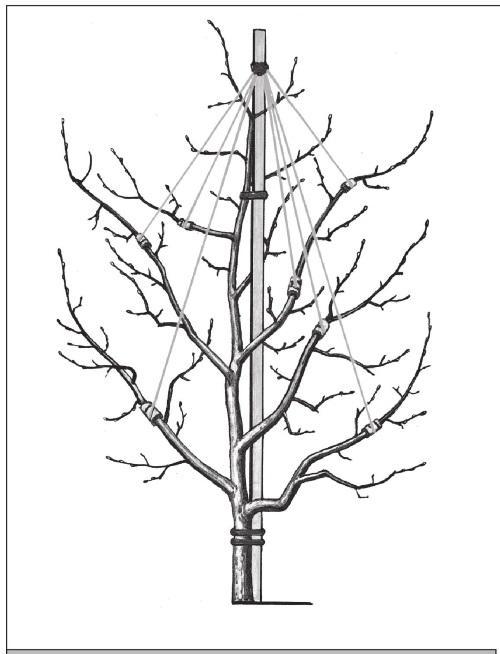
Growth regulation and the formation of each grafted branch are carried out in the same way as for vigorous branches on young trees. It is necessary to observe the principles of branch subordination and create a compact, non-dense canopy. When the wounds at the ends are covered with callus, the excess branches are pruned out. However, to accelerate fruiting, they can be bent to a horizontal or drooping position.
Usually, after 3–5 years, the canopy of the topworked plant reaches a sufficiently large size. At this time, the first thorough pruning should be performed, during which the main branches are identified and subordinated, and the overcrowding branches and those of the old cultivar temporarily left are removed, including those bent to accelerate the onset of fruiting.
Read next
Pruning and training For gardeners
Prevention methods and technologies for canopy strengthening of fruit trees
Pruning and training For gardeners
Techniques and rules for the first post-planting pruning of fruit trees
Pruning and training For students