
Artificial mist system installation for the propagation of plants using green cuttings
18 min read
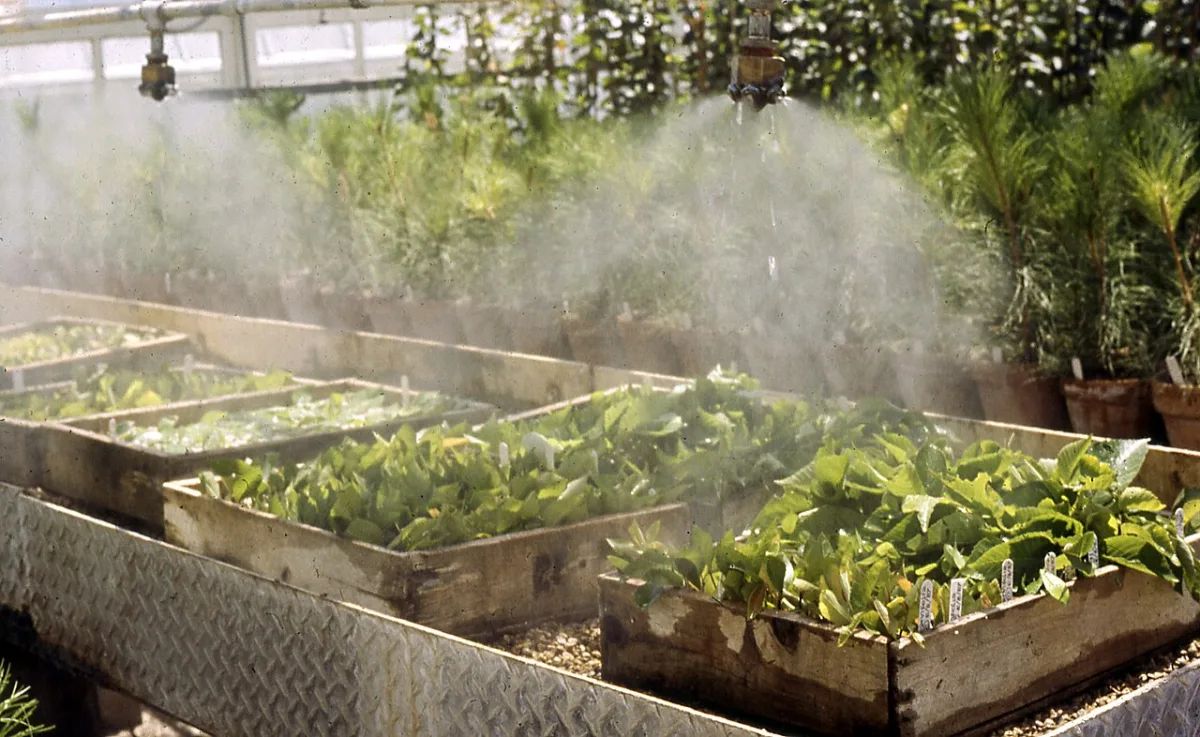
How many problems a gardener faces! And some of them sometimes seem insoluble. Where, for example, can one get the necessary planting material? Yet, there are relatively simple ways of plant propagation. One of them is rooting of green cuttings, which is carried out in specific small greenhouses called artificial mist installations.
An artificial mist installation (AMI), created by L. Baturin, is a greenhouse in which a relative humidity of 97-100% is maintained through water spraying. In an atmosphere of high humidity, rapid growth and rooting of cuttings occur. The AMI operates during two or three summer months, so no additional heating is required.
Operational experience has shown that in an AMI, one can grow strong nursery plants of black currant, gooseberry, panicled hydrangea, peonies, and other easily rooting plants from cuttings in one year. Over two years, apple nursery plants also grow well from cuttings. Their height reaches 80-100 cm with 2-3 skeletal branches on the trunk.
In such an installation, it is also possible to grow nursery plants of such difficult-to-root plants as edible honeysuckle, stone fruit rootstock, jasmine (mock orange), sea buckthorn, red currant, and others within two years.
7 6 8 1 5 и. р. 6 3 р АВА 12 |.1 й 8 и 4 РЯ Ри, 2 9 7-5 \ 15 14 ь -®
Block diagram of the artificial mist installation: 1 — fan;
2 — heater; 3 — air humidifier; 4 — ventilation hatch actuator; 5 — electronic control unit; 6 — outdoor temperature sensor; 7 — indoor storage temperature sensor; 8 — electromagnetic switch,
9 — water pipe; 10 — electromagnetic water valve; 11 — installation humidification switch; 12 — water valve switch
13 — artificial mist compartment; 14 — water sprayer; 15 — dry compartment
Up to 200 green cuttings of easily rooting plants and up to 100 of difficult-to-root ones can be placed on 1 sq.m of usable AMI area. Cuttings of easily rooting plants (black currant and others), treated with growth substances, usually root 4-6 weeks after planting. During this period, they should be thinned out, leaving 100 plants per 1 sq.m. The removed cuttings with roots are replanted elsewhere, preferably under a cover. Newly planted plants need to be sprayed with water 4-5 times a day at first.
The structure of the installation is a film greenhouse divided into two compartments: dry (small) and humid (large). A water pipe equipped with a sprayer is connected to the humid compartment. Temperature sensors are placed in the dry and humid compartments. When water is sprayed, the temperature of the humid compartment drops compared to the temperature of the dry one. The sensors record the temperature difference and, through a control device, send a signal to shut off the water. As soon as the temperatures in the compartments equalize, spraying resumes.
The intervals between sprayings and their duration are regulated within a wide range: the duration of spraying — from units to tens of seconds; intervals (the humidity level is linked to them) — from minutes to hours. The adjustment of intervals occurs by changing the temperature difference required to trigger the control device. The duration of spraying depends on the location of the sensors in the compartments: the closer the sensor is to the sprayer, the faster it cools down and the faster the water is shut off.
A gardener from the Kharkiv region, V. Kanyuka, believes that it is best to root cuttings in a protected ground, in small film greenhouses. The result will be better the more attention is paid to creating optimal conditions and maintaining air humidity in the greenhouses close to 100%. The leaves of the plants must be kept constantly moist, but at the same time, water should not drip from them. This can be achieved with the help of an artificial mist installation (AMI).
It is a system of nozzles that spray water into the smallest droplets, to the state of mist. Each AMI section consists of two parts — upper and lower. The upper one is a gable greenhouse measuring 2x2.8 m and 80 cm in height.
А Г У ‚ АЯ 7 9 8 6 21 их 5 м р х М М ИНН, м их Я ни, тя. — 6 АЙ а
Artificial mist installation (a) and control block diagram (b): 1 — film cover; 2 — wooden frame; 3 — substrate; 4 — nutrient layer; 5 — drainage layer; 6 — nozzle bar; 7 — water barrel; 8 — centrifugal electric pump; 9 — control unit. Its frame made of 35x35 mm wooden slats is made rigid so that it can be lifted by any edge and moved if necessary. The greenhouse sits tightly with its base, as if on a foundation, on a 15-18 cm high wooden frame made of slab wood. It is dug into the ground to half its height and set strictly horizontally. Attention should be paid to the following: the lower part of the greenhouse and the upper edge of the frame must match exactly so that there are no gaps between them; otherwise, outside air will dry out the cuttings, and they will perish. However, if small gaps do appear, it does not matter: when the film is stretched over the greenhouse frame, the excess at the bottom should be trimmed so as to cover the gaps. Since groundwater in many areas is sometimes located very deep, and rainy years are rare, drainage may not be necessary. The soil is generously enriched with humus and mineral fertilizers at a rate of 8 g of potassium and 12 g of superphosphate per 1 m² of the bed. Sand is necessarily added to make the soil light, loose, and with good filtration properties. For gardeners whose plots have stagnant water, it is better not to dig in the frame but to pile up a reliable layer of soil. On top of the nutrient soil layer, a substrate (coarse sand) 2-4 cm thick is poured and carefully leveled. Now you can proceed to the installation assembly.
The duration of rooting for some cultivars can reach a month, so it makes sense to make the MIST system fully automatic. For those gardeners who have a water supply with suitable pressure on their plot, a solenoid valve will be needed instead of an electric pump.
The greenhouse is oriented from east to west along a row of fruit trees, thanks to which it will be shaded even at noon.
The main components of the control unit are two time relays. One counts minutes and determines the interval between activations. You can use the 2 RVM time relay, which allows you to program the unit's operation for a day. To count seconds, i.e., the duration of activation, the RV-4 relay with an interval from 0 to 60 seconds or the RVP pneumatic relay are suitable.
Green shoots are harvested early in the morning, while the plants have not yet wilted from the heat, and are planted the same morning. Cuttings 4-8 cm long are cut with sharp pruning shears; the top cut is made above a bud, the lower one — slightly slanted below it. 1 or 2 leaves are left above the ground, depending on the planting density and the size of the leaf blade. Neighboring plants should not shade each other. The lower leaves are removed.
Before planting, the bed is moistened and marked with a stick. Cuttings are inserted into the substrate so that the lower cut does not touch the ground. When planting, the sand around the cutting is firmly pressed down with your hands.
| Distance between cuttings in a row | 3—5 cm |
| Distance between rows | 5-7 cm |
| Application rate per 1 sq. m | 300—400 cuttings |
To accelerate rooting, heteroauxin, sodium humate, a 25% solution of natural honey in water, and "Yuka" growth powder are used. The work takes a lot of time, so freshly planted cuttings are sprayed with a manual sprayer before the MIST system is turned on. Immediately after planting, a film cover is lowered onto the bed.
On the first day, the MIST system is turned on manually, timed, and the automatic operation mode is selected. For the first three days after planting, the greenhouses are covered with dense shading materials to lower the air temperature inside. For the next 5-7 days, they are slightly shaded from the sunny side with film whitened with lime. It is monitored that the temperature inside does not exceed 27-28 °C.
During this time, calluses with root tubercles form on the lower cut of the cuttings. Now the plants need top dressing with superphosphate (3 g per 1 m²) and increased ventilation. For this, windows are cut in the upper part of the end sides. After roots appear, a hardening period follows, i.e., gradual acclimatization of the plants to dry outside air.
For each cultivar, there is an optimal time for taking cuttings. Usually, it is June. Shrubs root better than trees, and varietal, highly productive trees — worse than wild-growing ones. Depending on the cultivar and crop, successful rooting of cuttings can exceed 90%.
When harvesting green cuttings for the propagation of crops, intensive rooting occurs in a so-called moist cut. That is why green cuttings are rooted in artificial mist systems.
Gardener L. Leonova made a small hotbed, where mist is formed without the help of such a system. For such a hotbed, a small trench is dug in a shaded part of the garden, 40-50 cm wide and up to 30 cm deep (it can be deeper). The length of the trench is arbitrary. The walls of the trench need to be compacted, and about 2 cm of sifted sand is poured on top of the fertile soil at a depth of 15 cm.
Green cuttings are planted in the sand (hardwood ones in the spring). The entire trench is covered with a frame made of thin bars and slats. The length of the frame should be equal to the length of the trench, and the width slightly larger so that the frame bars do not slide down. Thin white fabric is stretched over the frame, and it is covered with film on top so it does not get dirty; it is advisable to remove the film when it rains, otherwise, moisture will not enter the trench.
Designs of hotbeds and nursery beds for rooting cuttings
For plant propagation by green cuttings in open soil, a simple trench with a frame is used. Before planting, the soil inside the trench and at its edges is abundantly watered and compacted. Water seeps through the capillaries of the earthen walls, creating a constant moist mist inside the enclosed space. The frame does not need to be removed when watering — water is poured directly from above onto the cover material.
In winter, the top of the trench frames must be insulated to protect the cuttings from freezing. White cover material or gauze is periodically removed and washed, as dirt reduces light transmission.
For the propagation of hard-to-root crops (rhododendron, orange, laurel, magnolia, camellia), a nursery box with electric heating is used. The frame is assembled from boards, and the inner walls are lined with galvanized iron to protect against dampness. The front wall of the box should be 50 mm lower than the back, and the structure is tightly closed on top with a glass lid on hinges.
- Box dimensions — 35x35x40 cm
- Board thickness — 20 mm
- Mesh height from the bottom — 15 cm
- Heating lamp power — 25 W
- Daytime lamp switch-off threshold — 22 °C
At a height of 15 cm from the bottom of the box, a galvanized mesh with 5x5 mm cells is installed, reinforced against sagging by six transverse wooden slats. Drainage, moisture-retentive, and nutrient layers are placed sequentially on this mesh. The correct layering provides an optimal water-air balance for root development.
- Place a 1 cm thick layer of coarse pine needles without branches on the metal mesh.
- Add a 1 cm thick layer of peat moss.
- Add a 2 cm thick layer of nutrient soil.
- Cover the top with a 2 cm thick layer of washed coarse-grained river sand.
Heating for the nursery is provided by a 25 W lamp on the back wall, protected from moisture by a tin visor. A ventilation window with a sliding tin shutter is cut into the front wall. This same window is used to replace burnt-out lamps when necessary.
For year-round indoor use, a greenhouse made of two large flower pots is suitable. In the lower pot, an electric lamp is mounted on a metal stand and switched on at night. In the upper pot, an evaporation zone is organized: a small pot with water and a plugged bottom hole is placed in the center. The space around it is filled with gravel, then with a soil mixture of equal parts leaf mold, sod soil, and sand, and covered on top with clean washed sand.
Cuttings of indoor plants are prepared with three nodes and two internodes. Excess shoot length at the top and bottom is trimmed with a razor blade close to the bud, leaving only one or two upper leaves. Before planting in sand, it is recommended to treat the cuts with growth substances.
Dahlia and phlox cuttings must be planted with a bud. The greenhouse is covered from above with clean glass. When the rooting plants touch the glass, it is replaced with a glass or film dome.
Optimization of the light regime and orientation of greenhouses
Stationary greenhouses, unlike simple film covers, allow for year-round climate control and working in comfortable conditions. Illumination directly affects the yield of vegetable crops, so in winter, the areas are often used for forcing greens. For raising transplants during this period, artificial supplementary lighting systems are installed.
When designing winter greenhouses, the low position of the sun is taken into account — in winter, the angle of incidence of the rays is about 15°. To maximize the use of solar radiation, the side walls are made slightly inclined. The best illumination is provided by roofs with unequal slope angles.
| Slope direction | Slope angle |
|---|---|
| Southern slope | 60—75° |
| Northern slope | 30° |
The position of the sun changes throughout the year, which affects the illumination of the greenhouse walls. In winter, direct rays fall only on the southern wall, while in summer, the sun illuminates the ends during the morning and evening hours. The orientation of the greenhouse ridge is chosen strictly based on its operating season.
- Winter greenhouses: oriented with ridges in the east-west direction.
- Spring greenhouses: oriented with ridges in the north-south direction.
With such an arrangement in winter greenhouses, the best lighting conditions are provided in the winter months, while in spring greenhouses, a more smoothed light regime is maintained during periods of possible overheating. When choosing a site for greenhouse construction, attention should be paid to protection from prevailing winds. This factor is especially important to consider when growing plants in winter, as strong wind increases heat losses.
Light transmission in greenhouses of various configurations: a — greenhouse of traditional design; b — greenhouse with inclined side walls; c — greenhouse with unequal roof slopes.
If there is no sufficiently wind-protected place on the plot, it is advisable to enclose the greenhouse with a fence or a hedge 1.8—2 m high. It is better to place such protective structures on the north, north-east, or north-west side, and the distance to the greenhouse should not be less than three times its height. To protect the greenhouse structure from strong southern, south-eastern, or south-western winds, the fences should be located at a distance 4-5 times its height.
A greenhouse should be built on a well-drained plot with a low groundwater level; in some cases, drainage is recommended. In addition, the plot should have a minimal slope to reduce the volume of earthworks, which is very important when building large-area greenhouses.
Modern industrial-type greenhouses are assembled from factory-made parts, which significantly simplifies and speeds up their installation. Most structural elements are standardized, allowing them to be used in various types of greenhouses.
The main structural elements of greenhouses are: foundation, base, posts, and frame trusses.
In winter glass greenhouses, the base must have a height of 0.3 m, and in spring plastic film greenhouses — 0.1 m. To allow water drainage along the roof gutters, a structural slope of 0.03 is provided.
Steel structural elements of greenhouses are manufactured from special bent lightweight profiles. The elements to which glass or film are attached — muntins — are often made of aluminum and its alloys.
Greenhouse sealing is of great importance and depends on the methods of fastening glass and film. In greenhouses for individual use, with glass covering over metal surfaces, a T-section muntin is used, and the glass is secured with clamps made of tin or aluminum strips. Various methods of glazing sealing are shown in the figure.
Let us consider another important issue, such as the fastening of frames to the frame. Locking devices are often used for this. They are made differently on the walls and on the roof of the greenhouse. On the roof, they must be sturdy, holding-
3 ri GA 277) $ re] 2 r RNII 7227204. \ 2297204 72222] / [222722 ZO 3 cha». 2 y 7 a. y y b #7 t 9) y y 7220 2 M IA 1 o y y 4 1 y RYA || 7704 I r = o 77722700: 42777 2 YA K A o ee: RN 6 YA SY ——— g 25 V 1 7 6 => 4 E A sr ord, [o DI, o r = r» 5 2 == Ri, ER? 7 e nyay d — Methods of glazing sealing: a — using sealing mastic; b — glazing without putty ; c — using a gasket; d — fastening glass to a T-section muntin; e — fastening glass with putty to a wooden muntin; f — connecting glass using a clamp; 1 — glass; 2 — muntins; 3 — clamps; 4 — sealing mastic, putty, or gasket; 5 — KL-3 clamp; 6 — pins the frames by all their corners. This is because the wind force that tears off frames is much more significant on the roof than on the walls. Devices locking the frames on the walls should be made not only reliable but also as simple and convenient to operate as possible, since these frames have to be removed and installed almost every day to ensure a comfortable temperature in the greenhouse. A locking device for frames on greenhouse walls is shown in the figure. It consists of tongues screwed to the beam and protruding 2-3 cm below the beam, and bolts of a slightly conical shape-
Transoms are locked with devices similar to the one shown on page 57. Doors are equipped with window hooks from the inside and outside.
The most common materials for covering greenhouses are glass and polyethylene film.
Glass transmits 83-85% of visible radiation, about 45% of ultraviolet, 85% of short-wave, and no more than 10% of long-wave infrared radiation, which ensures a favorable temperature regime in the greenhouse. Usually, sheet window glass 4 mm thick and 600 mm wide for hangar-type and 750 mm for block greenhouses is used. The mass of 1 m² of such glass is 10 kg.
But with all its positive qualities, glass has a serious drawback — fragility.
Polymer materials are not inferior to glass in their characteristics: 70-80% of sunlight passes through polyethylene film. The film is elastic and frost-resistant, resistant to acids and oxidizing agents, and is also much cheaper than glass.
For covering greenhouses, a film with a thickness of 0.1-0.2 mm is used. It is produced in rolls as a sheet, tube, or half-tube with a width of 0.8 m to 8 m. The ratio between the thickness and mass of the polyethylene film is given in the table.
Read next
Farm machinery For agronomists
Design and operating principles of the UF-1501 mounted sprayer
Greenhouses and covers For gardeners
Agrotechnology of cranberry, lingonberry, and highbush blueberry cultivation on a plot
Greenhouses and covers For gardeners