
Preparation and enrichment of nutrient soil mixtures for vegetable transplants
20 min read
phosphoric acid turns into a form that is poorly accessible to plants, and young plants may suffer from a lack of phosphorus. In addition, micronutrients become inaccessible to plants, especially boron and manganese. Peat is very poor in micronutrients, especially copper; therefore, one should add to the mixture with lowland peat, calculated for 100 pots: copper sulfate and boric acid dissolved in hot water — 0.3–0.4 g each, and manganese sulfate — 0.1–0.2 g. With the addition of microfertilizers, the root system of the transplants develops better, the plants become more resistant to low temperatures, begin to bear fruit sooner, and the yield of vegetables increases. Before starting to prepare the nutrient mixture with peat, one should determine the acidity of the peat in an agrochemical laboratory and lime it if necessary. This should be done two weeks before preparing the mixture for better interaction between the peat particles and the lime. Approximate doses of ground limestone or chalk per 10 buckets of peat: at pH 4.5–5.0 — 600 g, at pH 5.1–5.5 — 500 g, at pH 5.6–6.5 — 300–200 g. Slaked lime should be added in smaller amounts, and wood ash in 2–3 times greater amounts. If sod or garden soil is used to prepare the mixture, one must know its mechanical composition, taking into account that heavy clay soils worsen the physical properties of the mixture. Such soil should be mixed with humus not in equal amounts, but taking two parts of humus for one part of soil. In sandy soil, moisture is poorly retained, which means that in this case, a 1:2 ratio may also be used. If it is necessary to replace humus with sawdust, preferably aged, it should be pre-moistened with a solution of urea or ammonium sulfate (0.5 kg per 10 l of water per 3 buckets of sawdust). Before mixing the organic part of the mixture, peat and sod soil must be sifted through a screen with a 2x2 cm mesh, then stacked in layers, measuring the necessary amount with buckets and sprinkling each layer with the required dose of superphosphate. Thorough mixing of the mixture is very important. Nitrogen and potassium fertilizers are added in dissolved form, preferably in diluted manure slurry mixed with a fertilizer solution.
A more thorough mixing of the mixture components occurs when two people participate: they stand with shovels by the pile facing each other, run the shovels through the soil, digging into the pile not to the full length of the shovel blade, but only to its longitudinal half until the ends of the shovels meet; meanwhile, the pile partially collapses and the components of the mixture are mixed. This operation is repeated until the entire pile has been turned, then the same process starts from the other side. Three or four turnings are sufficient to form a homogeneous mass. If well-decomposed, weathered lowland peat is available, 10–12 buckets are taken, 3–5 buckets of fresh manure humus or prepared aged wood sawdust and 1 bucket of fresh manure slurry diluted with water are added. The higher the degree of peat decomposition, the more sawdust is added to the mixture. Mineral fertilizers are applied in the following amounts: for cabbage transplants — 100 g of urea or 200 g of ammonium sulfate, 0.5 kg of superphosphate and 100 g of potassium nitrate; for tomato transplants — the same amount of nitrogen fertilizers, but 1 kg of superphosphate and 120 g of potassium sulfate; for eggplant transplants, the dose of superphosphate is increased to 1.5 kg; for cucumber transplants — 150 g of urea or 300 g of ammonium sulfate, 0.5 kg of superphosphate and 150 g of potassium sulfate. If there is no peat, it is replaced by humus (10 buckets) with the addition of sod or garden soil (5–6 buckets), but for cucumber transplants, it is better to take equal amounts of them. The doses of mineral fertilizers in a mixture without peat are reduced by three times. If the sod or garden soil is heavy clay, sand is added to the mixture. The method of growing transplants on a sawdust substrate deserves attention. Sawdust is pre-moistened with a 2-percent solution of ammonium nitrate and kept in a moist state for 10–12 days until the resinous smell disappears. Then superphosphate and wood ash are added, 1 kg each per 100 kg of sawdust, and moistened again with a 1-percent solution of ammonium nitrate until fully saturated. Then the sawdust is poured onto the surface of the soil in a film greenhouse in a layer 5–7 cm thick, and garden soil is placed on top of the sawdust in a layer of 4–5 cm, into which sprouted seed are sown. Four to five days before selecting the transplants, cuts are made with a knife lengthwise and crosswise, resulting in cubes for planting in the open ground. If transplants are grown with picking, it should be taken into account that seedlings especially need enhanced nutrition, so it is better to provide the same nutrient mixture for seedlings as for transplants. It is believed that the amount of nutrients in a mixture of purely organic fertilizers is sufficient for the development of seedlings. However, this does not take into account that, despite the fact that the growth period of seedlings before picking is short, they must be provided with ready-made food in such a quantity as to be strong and vigorous by the time of picking. That is why a complete nutrient mixture is also necessary for seedlings. Growing white cabbage and cauliflower transplants. The earliest maturing cultivars of white cabbage are Iyunskaya and Skorospelaya. The growing season from emergence to the formation of a head weighing up to 1.3 kg is 3–3.5 months. The cultivar Nomer pervyy gribovskiy 147 matures six to eight days later, and the mid-early cultivar Zolotoy gektar 1432 matures five to seven days later. Early-maturing cauliflower cultivars include Garantiya with a growing season of 84–97 days, Movir 74 — 102–105 days, and Rannyaya gribovskaya 1355 — 100–110 days. Mid-early cultivars with larger heads also deserve attention — Otechestvennaya and Urozhaynaya with a growing season of up to 128 days. When sown at the same time as early-maturing cabbage cultivars, early-maturing cauliflower cultivars mature 10–12 days earlier than cabbage. To extend the harvest period of cauliflower, several cultivars should be grown with simultaneous planting of transplants and sowing of seed directly into the open ground. Seedlings are grown in indoor conditions. Seed are sown in mid-March in such a way as to plant 45–50-day-old transplants into the ground, in the third ten-day period of April in light soils, and in the first ten-day period of May in heavy soils. Seedlings are grown in boxes 50 cm long, 30 cm wide and 10 cm high, with a removable longitudinal wall.
Cabbage seedlings grown in peat-humus pots, which makes it easier to extract the seedlings for pricking out. Pot shards or small stones are placed at the bottom of the box for drainage, and then a slightly moistened nutrient mixture is added, leaving a small gap to the top edge. On the leveled and slightly compacted surface, grooves for sowing seeds are marked 3 cm apart and 0.5 cm deep; after sowing, they are covered with the same mixture through a sieve and also slightly compacted. In case of excessive humidity and lack of air, seedlings are affected by damping-off, which manifests itself in the darkening of the stem and constriction of the root collar; the seedlings (and transplants) lodge and die. To protect the seedlings from damping-off, the mixture is pre-treated with a potassium permanganate solution (2 g per 10 l of water), and after sowing or pricking out, the surface of the box and pots is sprinkled with sifted wood ash at a rate of 100 g per 1 m2 of area. After sowing the seeds, the soil is sprinkled with warm water, and the box is covered with glass or film. The temperature before emergence is maintained within 18—20° C. It is necessary not to miss the moment of emergence and immediately remove the cover, and lower the temperature to 8—10° C for four to five days. In the following days, the same temperature is maintained at night, and during the day in cloudy weather — 12—14° C, in sunny weather — 16—18° C; for cauliflower transplants, it should be 2° C higher. Pricking out of seedlings is usually recommended to be carried out five to seven days after emergence. This is conditional; the important thing is not the number of days, but the condition of the seedlings—well-developed cotyledons and a root tuft, with the latter developing better at lower temperatures. When removing, the seedlings should be held not by the stem, but by the cotyledons, otherwise, one can imperceptibly squeeze and damage the plant. A depression for the seedling is marked with a peg, into which it is lowered, pressing the soil to the stem along its entire length with the same peg, and not as some people do: lower the seedling, and cover it with soil from above, leaving the stem in a void. A feature of the plant is its ability to form roots when the stem comes into contact with moist soil. If weather conditions do not allow pricking out seedlings in a plastic greenhouse, they are pricked out into pots in indoor conditions and then taken out to the greenhouse. The pot diameter is 6 cm; to obtain an extra-early harvest, some seedlings are planted in pots with a diameter of 8 cm. The pots are placed close to each other, and the gaps are filled with the nutrient mixture. In plastic greenhouses, air humidity rises to 80—85%, which creates conditions for the development of fungal diseases, so it is necessary to ventilate the greenhouses regularly by opening the top vents first, and 10 days before planting the transplants, the side and end enclosures must be fully opened, first for the day, and three to four days before planting — also for the night. This contributes to good hardening of the transplants. Naturally, when ventilating, one should monitor the temperature, avoiding excessive cooling and especially overheating. The transplants should be watered rarely but abundantly, after which the greenhouse should be well ventilated. Frequent surface irrigation leads to the disease of transplants, infestation with damping-off and downy mildew. At the same time, the transplants suffer from drying out of the root system. Insufficient watering leads to the depression of plants and premature aging. From such transplants, you will not get either an early harvest or good heads. It would seem that when growing transplants in a nutrient mixture, the plants are provided with all nutrients. However, top dressing of plants enhances growth, improves the quality of transplants, and contributes to an early harvest. It is enough to feed the transplants twice: the first time when the third leaf appears, the second — when the fourth leaf appears, and in the first top dressing, 20 g of urea, 40 g of superphosphate, and 10 g of potassium chloride per 10 l of water should be applied; in the second top dressing, the same fertilizers are used in amounts of 30, 50, and 20 g, respectively. In the second top dressing, mineral fertilizers can be replaced with organic ones: mullein diluted with water 6—8 times, manure slurry — 3—4 times, or chicken manure diluted 12—15 times. However, when feeding with manure slurry, it should be borne in mind that it contains almost no phosphorus, so 20 g of superphosphate should be added per bucket of solution. For cauliflower, 2 g of boric acid and ammonium molybdate per 10 l are added to the fertilizer solution for top dressing the transplants, or the plants are sprayed with the same solution. It is better to feed the transplants on sunny days, combining the top dressing with the next watering to avoid over-moistening. The soil temperature is of great importance for the absorption of nutrients by the transplants. The optimal temperature for the absorption of nitrogen and potassium is within 11—18° C, and phosphorus — 18° C. When growing transplants indoors, it must be prepared for planting in open soil. To do this, it should be kept at lower temperatures and accustomed to direct sunlight and air. One must monitor the outside air temperature and, as soon as it rises to 15° C, and on windless days up to 10° C in the shade (in sunny weather), the seedling boxes should be taken out to a balcony or an open veranda. To increase the resistance of plants to low temperatures in open soil, two days before planting, the transplants should be fed with a potassium nitrate solution (a tablespoon per 10 l of water). Transplants of early white cabbage and cauliflower, if possible, can be grown in a hotbed, which requires winter preparation of horse or cow manure mixed with peat crumbs or sawdust (2:1) or household decaying waste. This future biofuel for the hotbed is densely packed into a stack 1 m high and 2 m wide, the length is arbitrary, calculated at 1 m3 per hotbed frame with an area of 106 x 160 cm. Under the frame, one can place from 250 plants (8x8 cm) to 400 (6 x 6 cm). For better heat retention, a pit 50—60 cm deep should be made, for at least three frames. Naturally, such a quantity of transplants will not be needed, so the free area can be occupied by radish, lettuce, Chinese cabbage, green onions, i.e., crops, after harvesting which and the cabbage transplants, one can grow transplants of cucumbers, squash, and pattypan squash for open soil, as well as cucumbers and tomatoes. For tomato transplants, a separate hotbed is needed, right next to the first one, considering that compared to growing transplants in indoor conditions or in a plastic greenhouse, the growing period can be extended up to 60 days. And under a hotbed frame, one can grow 150—125 plants (10 x 10 cm or 12 x 12 cm). In the same hotbed, one can also grow 70-day transplants of eggplants and peppers (250 and 400 plants, respectively). The pit for the hotbed is dug 150 cm wide at the top and 130 cm at the bottom, positioning it lengthwise from west to east. Thick boards (the frame) are laid on top, raising it by 10—12 cm on the north side. For the support of the frames on the south side, slats are nailed. The stack of biofuel is monitored (it must be covered from freezing with soil or peat), and at the slightest heating in separate places, it is strongly compacted; in the spring, a week or two before filling the hotbed, the stack is turned over, i.e., laid nearby into a loose stack with the addition of fresh manure. The loose state facilitates the influx of air oxygen, while microorganisms begin to develop, the temperature of the biofuel rises, and it "ignites". On the day of filling, the pit is cleared of snow. If the soil is frozen, strawy manure is placed at the bottom with a layer of 15 cm or sawdust — with a layer of 10 cm, and the biofuel is laid, but not to the very top, so that the covering frames do not come into contact with it. The uniform "burning" of the biofuel and the timing of obtaining transplants ready for planting in the soil depend on the quality of the hotbed filling. When filling the hotbed in cold weather with strong wind or if the soil is too dense P. I. Kuryukov
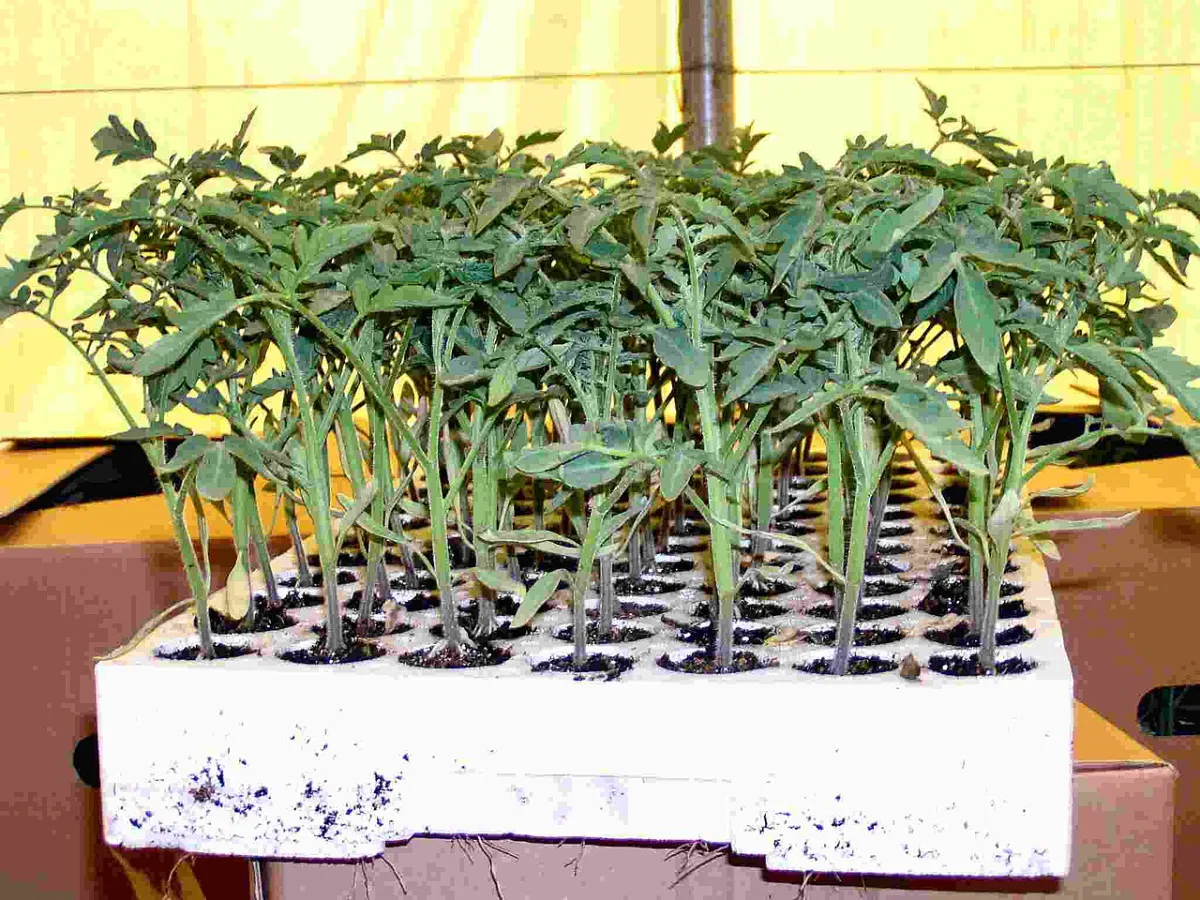
With tight packing, the biofuel does not "burn," and if it is too loose, intense "burning" begins, and the temperature in the hotbed rises and falls rapidly. If the center of the hotbed is insufficiently compacted, it quickly settles, resulting in a trough-like surface, and waterlogged spots form during irrigation. If the biofuel is not pressed along the edges of the hotbed, the soil separates from the walls of the hotbed. If the surface of the biofuel is not leveled, an uneven soil layer results when loading the soil into the hotbed. A thin layer of soil leads to scorching of roots and yellowing of transplants, while a thick layer results in a drop in temperature and uneven development of transplants. If frozen manure gets into the hotbed, the "burning" is delayed, which leads to an uneven hotbed temperature. If manure with a white mold coating gets into the hotbed, it develops rapidly, penetrating even the thickness of the added soil; toadstool fungi are also dangerous. To prevent them, the biofuel is sprinkled from above with lime or ash. As soon as a hotbed area equivalent to one frame has been packed, it is immediately covered with the frame, and this is done sequentially, frame by frame, so that the hotbed does not cool down. The frames are covered with mats or sacking, and the hotbed walls are banked with hot manure. After two or three days, the biofuel warms up and settles, and hot biofuel is added to the hotbed, pressing it down with the foot along the hotbed wall, as it pulls away from the walls during settling. The resulting depression is filled with cold manure and its surface is leveled with a light wooden tamper (a small board with an angled handle). As soon as the hotbed warms up, a mixture of equal parts peat, humus, and sod soil, prepared from autumn, is immediately poured into it in a layer 4–6 cm thick. It should be noted that if the biofuel does not warm up enough, early filling with hotbed soil can "stifle" the hotbed. During the "burning" of the manure, carbon dioxide and methane are intensely released, displacing oxygen from the air, which can not only inhibit "burning" but also lead to the death of transplants; therefore, it is necessary to ventilate the hotbed daily after packing by lifting and lowering the frames. Pots with pricked-out transplants are placed in the hotbed when the temperature under the frames rises to 20–25° C; placement starts not from the edge, but from the middle of the hotbed, close one to another, protecting the plants from the sun and wind. Not the whole hotbed is opened, but only one frame under which the transplants are placed. To avoid the appearance of damping-off on the transplants, the hotbed is intensely ventilated, sand is added to the transplants, and irrigation is regulated. The plants are watered so as to soak the pots through. Such watering ensures the maintenance of soil moisture for several days. During irrigation, one must also ensure that the edge plants are carefully watered; otherwise, by the time of planting in the open ground, they may be developed significantly worse than those in the middle. Such transplants form a head later and are of a smaller size due to the suppression of the plant. If high-moor (sphagnum) peat is available, it is also used in a mixture with hot manure and the addition of lime for packing hotbeds; and if there are peat bricks at the nearest peat enterprise, they can be used instead of boards for the hotbed frame. It turns out that peat walls not only hold heat better in the hotbed but also produce heat themselves. Transplants of head and cauliflower should be planted simultaneously when the soil warms up at a depth of 10 cm to 6–8° C. Before planting the transplants, water or a weak (0.3 percent) solution of fertilizer is poured into the hole. Then a pot with a transplant is lowered into it (until the water or solution has soaked into the soil, which ensures that the mixture in the pot is saturated with moisture). With early planting, the edges of the pot should be at the level of the soil surface, and to preserve moisture, the surface of the pot is sprinkled with dry soil. With such planting, there is no need for so-called "settling" irrigation of the transplants, i.e., daily watering until the transplants begin to grow. Potted transplants do not stop growing after proper planting, as the root system is not damaged. On sunny days, planting should be carried out in the evening, and the next watering can be given after three to five days, depending on the weather. Growing tomato transplants. Early-ripening tomatoes are distinguished not only by earlier fruit ripening but also by the fact that plants yield the largest quantity of them in the first period of fruiting. The most early-ripening cultivars have a small bush, most often determinate, i.e., with limited growth, when the main stem ends in a fruit cluster. Early-ripening cultivars sometimes have a standard bush form. Early-ripening cultivars: Talalikhin 180, Prevoskhodny 176, Sibirsky skorospely, Solnechny, Barnaulsky konservny, Nevsky, Alpatyeva 905a, Kont, Pionersky, Gruntovy (Gribovsky 1180). In addition, mid-sized cultivars such as Leningradsky skorospely, Ukrainsky teplichny, and the hybrid Virovsky skorospely, as well as the new tall cultivar Pionersky with fruits weighing 60–80 g, are grown in greenhouses under film. For whole-fruit canning, early-ripening cultivars Barnaulsky konservny and Solnechny with small oval fruits are intended. Seeds sorted in a solution of table salt (a teaspoon per glass of water) are disinfected before sowing by placing them for 20 minutes in a 1-percent solution of potassium permanganate for protection against viral diseases (streak and mosaic), after which the seeds are washed with clean water. The disinfected seeds are subjected to hardening, for which they are placed for several hours between pieces of damp cloth at room temperature, and when they swell, they are placed in snow, on ice, or in a refrigerator, where they are kept for two days at a temperature of -2° C. Hardening swollen seeds at a variable temperature for five days is more effective: 18 hours at 0–2° C and 6 hours at 18–20° C. With such seed hardening, fleshy, short, strong sprouts form, densely covered with root hairs. However, hardening is only effective if the transplants are also hardened at a low temperature. Only by hardening seeds and transplants does the resistance of plants to unfavorable weather conditions increase and earlier and more uniform fruiting is ensured. If the transplants are not hardened, the positive effect of seed hardening is nullified. When growing tomato transplants with pricking out of seedlings, seeds are sown in seedling boxes. As already noted, tomato plants are especially sensitive to a lack of phosphorus starting from seed germination, when phosphorus is needed for the formation of the root system; therefore, it is not enough that the nutrient mixture is provided with a sufficient amount of superphosphate; it is also necessary to put two or three grains of granulated superphosphate into the hole before pricking out and, before planting the transplants, pour a tablespoon of superphosphate into the hole, mixing it with the soil. Phosphorus enhances root growth, contributes to earlier formation of the flower cluster, accelerates fruit ripening, increases the sugar and dry matter content in fruits, and prevents fruit cracking. However, tomato plants consume significantly less phosphorus than other nutrients. They consume the most potassium, then nitrogen. Moreover, plants require more nitrogen starting from the beginning of fruit growth. That is why during the fruiting period it is necessary to fertilize tomatoes with nitrogen-potassium fertilizer. If it is necessary to prick out seedlings, it should be done in the cotyledon phase, no later than the start of the appearance of the first true leaf. During this period, mass formation of root tubercles occurs, which are not damaged when the seedlings are picked. If pricking out is carried out at a later date, when the plants have already begun to develop roots, there is a danger of damaging them; as a result, the growth of such plants stops, and in the worst case, they may die. The unfavorable effect of pricking out is reduced due to the formation of roots on the hypocotyl when it comes into contact with moist soil. That is why it is necessary to press the soil against the entire surface of the small stem during pricking out. Pricking out tomato seedlings can be done not only with a dibber but also with a finger. With the index finger, press on the base of the roots, having first pinched off the long roots, and submerge the seedling into the hole almost to the base of the cotyledons. With a second movement of the fingers, press the soil to the seedling and level the depression. The seedlings are watered with warm water, covered with film, and, if the weather is sunny, shaded for two to three days. To obtain an earlier harvest, the size of the pots is of great importance. Their diameter should be no less than 8–10 cm, preferably 12 cm. With a smaller size, it is necessary to space the pots at the beginning of plant canopy closure to a distance of 12 cm (between stems) and fill the gaps with the nutrient mixture. Transplants grown in larger pots receive better conditions of nutrition and lighting and produce an earlier harvest. When crowded, transplants stretch, the stem becomes thinner, and lower leaves can...
Read next
Greenhouses and covers For gardeners
Technology of growing early white cabbage transplants in protected soil
Greenhouses and covers For gardeners
Sowing and growing technology of tomato transplants for greenhouses
Vegetable growing For students