
Selection and use of specialized gardening tools for tree pruning
8 min read
- Maximum cut for a pruning knife — up to 2 cm
- Maximum cut for a lopper — up to 2 cm
- Maximum cut for a pole pruner — up to 2.5 cm
- Maximum cut for pneumatic secateurs — up to 3 cm
In commercial fruit growing, the quality and speed of pruning directly determine the health of the plantings. A clean, smooth cut heals quickly and reduces the risk of the tree being infected by dangerous pathogens. For each technological operation — from budding to the removal of large skeletal branches — specialized tools must be used.
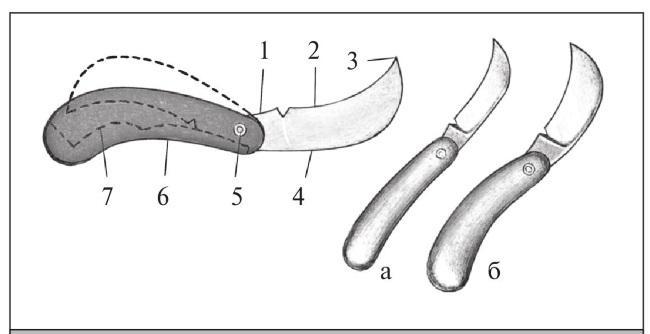
A pruning knife is indispensable for cutting live branches, removing thorns from rootstocks, removing thickening shoots, and performing furrowing. The curved blade allows for neatly smoothing wounds on the wood after using a saw. Manufacturers produce these tools in different sizes and with varying degrees of blade curvature. A pruning knife provides an ideally smooth cut but requires professional skill, so it is better to provide inexperienced workers with secateurs to avoid injuries and damage to the bark.
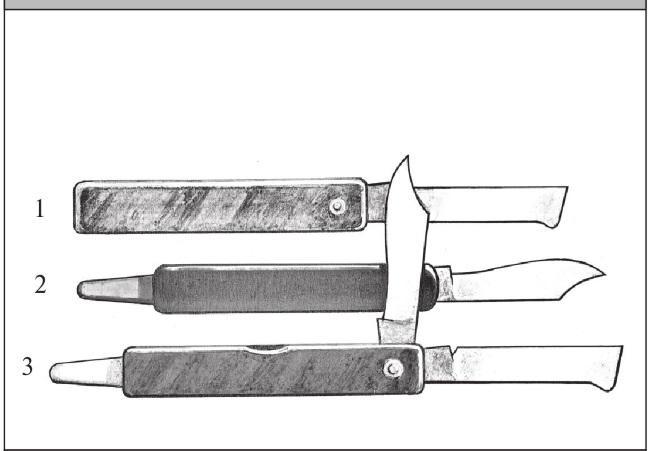
For budding (grafting with a bud), kerbing, and furrowing, a budding knife with a characteristic protruding heel on the handle is used. Grafting with a scion is performed using a grafting knife with a straight blade. If necessary, these tools can partially replace each other in auxiliary operations.
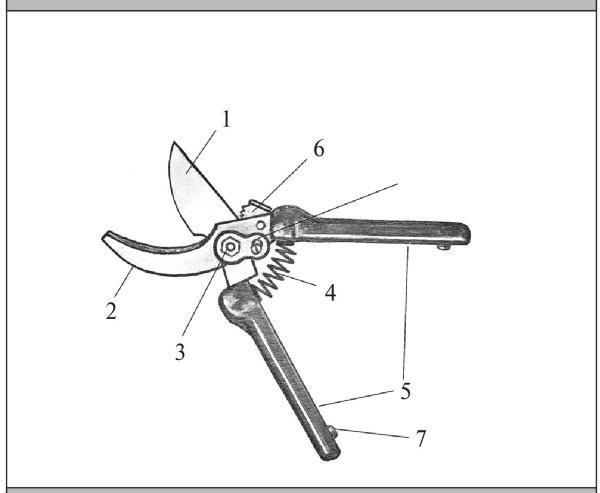
Secateurs are used for the rapid pruning of shoots and thin growth. In horticulture, bypass models with a curved blade and anvil secateurs with a flat counter-blade are used. It should be noted that when there are high requirements for cut quality, a bypass secateur is always inferior to a pruning knife.
For work in dense berry bushes, such as gooseberries or currants, secateurs with extended handles are used. They protect the pruner's hands from thorns and expand the working area. Garden shears with long straight blades are suitable exclusively for trimming hedges and borders, where pattern-based pruning is acceptable.
Tools for working at height and grafting materials
High-positioned branches are cut with a pole pruner, which is operated by a cord or lever mechanism. To remove hard and thick branches at a height, a curved pruning saw attached to a long pole is used. Guillotine loppers with adjustable blade clearance allow for quick access to the most difficult-to-reach areas of the canopy.
Do not cut branches thicker than 2.5 cm with a pole pruner. Otherwise, the tool will jam in the wood, and the tree will be left with ragged, poorly healing wounds.
If there is no special high-altitude equipment on the farm, you can assemble a temporary device based on ordinary secateurs:
- Securely attach the secateurs to a long wooden pole.
- Install a simple rope or wire drive to press the operating handle.
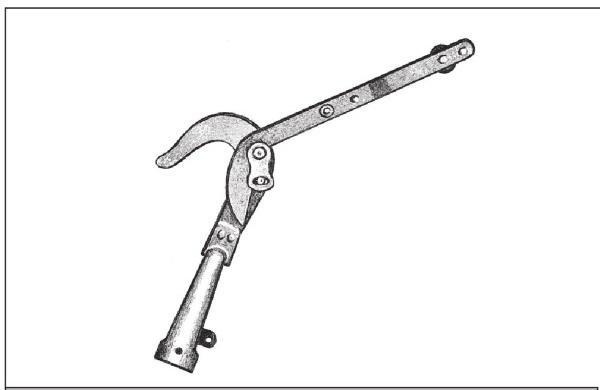
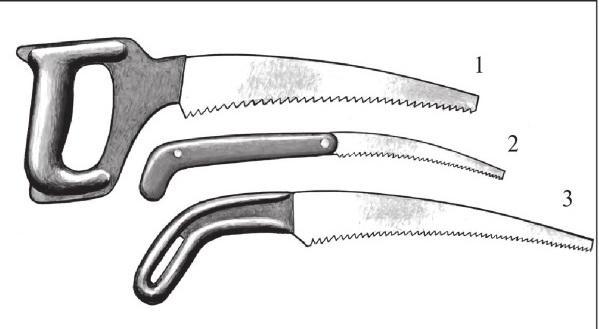
Pneumatic secateurs, powered by a compressor, significantly increase labor productivity in commercial orchards. They allow for the cutting of branches up to 3 cm in diameter without physical effort. Using an extension pole with a pneumatic drive eliminates the need for workers to carry ladders around the orchard.
The success of graft survival and the speed of wound healing directly affect the health of the tree and its future productivity. For binding grafts and top-working, it is recommended to use modern elastic synthetic films — polyvinyl chloride, polyamide, or polyethylene. They stretch well and create airtight protection against moisture and air, significantly exceeding traditional raffia in quality.
Thin compress polyvinyl chloride film is convenient because it gradually degrades and ruptures on its own under the influence of the external environment. Due to this property, it does not cut into the tree tissues when the branch or stem thickens. Other types of films do not possess such properties, so they require regular monitoring.
Protection of cuts and wound care after pruning
High-quality pruning does not end with the saw cut or the branch cut itself. Large wounds on a tree without proper protection quickly become gateways for fungal and bacterial infections. Over time, this leads to wood rot and the formation of cavities, which directly shortens the lifespan of the tree and reduces its productivity.
- Diameter of self-healing wounds — up to 1–1.5 cm
- Diameter of wounds requiring mandatory dressing — over 1.5–2 cm
- Service life of grafting wax — over 3 years
Trees heal small cuts on their own. However, if the diameter of the damage exceeds 1.5–2 cm, the wound must first be cleaned with a grafting knife or chisel down to healthy tissue and then treated with a protective compound. Grafting wax remains the best protective agent: it excellently stimulates callus formation, is not washed off by rain, and withstands sharp temperature fluctuations.
As an alternative to wax, one may use asphalt, bitumen, or Kuzbass lacquers. They disinfect the wound well but deteriorate quickly under sunlight, so the coating must be renewed every year. Among wood protection paints, only formulations based on natural ochre, soot, or red lead are permitted.
It is strictly prohibited to use lead white, verdigris, or other toxic paints to cover cuts. As they run off the wound surface, they cause severe chemical burns to the bark.
When using polyamide or polyethylene films for grafting, be sure to monitor the condition of the ties. Unlike polyvinyl chloride, these films do not break down on their own under the sun. As the branch thickens, they cut into the wood, so they must be loosened, retied, or removed in time.
During machine (contour) pruning, small cuts on the periphery of the canopy are usually not treated. These branches are quickly renewed during subsequent passes of the machinery. However, if mechanized pruning is supplemented by manual pruning, removing large skeletal branches or the central leader, all large wounds must be covered with grafting wax.
Sharpening, Honing, and Adjustment of Garden Tools
A smooth and clean cut that heals quickly can only be achieved with an ideally sharp blade. A dull or poorly adjusted tool crushes plant tissue, leaving ragged edges and burrs. To maintain tools in working order, you will need a sharpening stone, a fine-grained whetstone, a leather strop for honing knives, as well as a saw set and a file for preparing saws. Below is the step-by-step sequence for sharpening grafting knives.
- Place the entire flat of the blade of a new or dull knife on the sharpening stone.
- Move the knife with the blade facing forward, simultaneously sliding it upward and to the side — from the tip of the blade toward its base.
- To sharpen the reverse side, flip the knife over the spine and repeat the movement.
- If the knife has a single-sided edge, move it along the stone in only one direction (forward and upward), and merely touch up the flat side slightly at the end.
- After using the sharpening stone, refine the edge on the whetstone to remove deep scratches from the abrasive. For the final honing, use a leather strop.
During sharpening, the sharpening stone and whetstone must be constantly moistened with water. This is necessary to timely wash away metal shavings and spent abrasive particles. When working on an electric grinder with rapidly rotating wheels, the blade must be dipped into water regularly, otherwise, the steel will lose its temper due to overheating.
If a knife becomes slightly dull right in the garden, there is no need to spend time on a full sharpening. It is sufficient to quickly hone the blade on a moist whetstone and a leather strop, moving the tool lightly and only with the spine facing forward. Such operational honing allows for comfortable work throughout the day.
For a thorough sharpening of pruning shears, they must be completely disassembled. Work on the cutting side of the blade with an abrasive stone following the same rules as for knives. After reassembly, the clearance must be adjusted: the blade and the counter-blade must meet tightly and without gaps; tighten the adjustment nut if necessary. For light honing during the day, the pruning shears do not need to be disassembled.
Garden saws also require regular maintenance. Only a properly set tool produces an even cut without the blade jamming in damp wood. The saw teeth are alternately bent in opposite directions using a special saw set, after which each tooth is carefully sharpened with a triangular file at the required angle.
- Saw tooth set — 1.5–3 times the thickness of the blade
- Direction of tooth sharpening — from the inside only
- File profile for saws — triangular
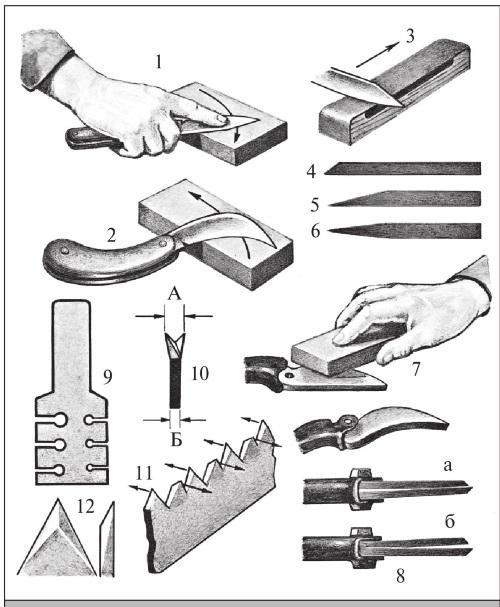
| Diagram of sharpening, honing, and adjustment of garden tools (to Fig. 103) | ||
|---|---|---|
| 1 — sharpening a grafting knife | 2 — sharpening a garden knife | 3 — honing a knife on a strop |
| 4 — new knife blade before sharpening | 5 — properly sharpened blade | 6 — improper sharpening with a rolled edge |
| 7 — thorough sharpening of pruning shears | 8 — assembly of pruning shears (a — correct, b — incorrect) | 9 — setting tool (saw set) |
| 10 — correct saw set (distance A is greater than blade thickness B) | 11 — sequence of setting teeth | 12 — properly sharpened saw tooth |
- Set the saw teeth by bending them alternately to the sides (one to the right, the other to the left) using a saw set.
- Align the set angle: clamp the blade between two metal plates and use light hammer taps to level the protruding teeth with the rest.
- Sharpen new or heavily dulled teeth using a triangular file on the inner side, forming sharp tips of equal height.
- Clean the tool after work, wipe the metal parts dry, and lubricate them before putting them into storage.
Read next
Pruning and training For gardeners
Techniques and rules for the first post-planting pruning of fruit trees
Pruning and training For agronomists
Technology of top-grafting fruit trees using framework builders
Pruning and training For gardeners